
If you’re reading this right now. There are high chances are you’ve bought your domain. Maybe you even bought hosting. You’re very excited to start working on your website.
Then you logged into cPanel… and automatically froze.
I have been there before.
The first time I tried installing WordPress, I stared at my laptop screen for 45 minutes. I clicked random icons. I refreshed the page like it would magically explain itself to me.
It didn’t just stared back.
So in this guide, I’ll walk you through exactly how to install WordPress on cPanel, using Namecheap cPanel as our example.
Step by step. No tech jargon. No confusion. Just clear instructions, so you are on the right track.
By the end of this guide, your WordPress site will be live. Not “almost live.” Not “halfway.” Live. Now let’s begin
Why Installing WordPress Manually Matters
Before we jump in, let me tell you something most beginners don’t realize.
To me there are two types of WordPress users:
Those who understand what’s happening behind the scenes.
Those who panic when something breaks.
Guess which group makes money faster?
Exactly, those who understands what happened behind the scenes.
When you understand cPanel and how WordPress connects to your hosting, you gain full control. And you know control equals confidence.
Back in 2018, I accidentally deleted a database on a client website because I didn’t understand how WordPress was connected to cPanel. That mistake cost me $60 and one very angry phone call.
Lesson learned.
So today, I’ll make sure you don’t repeat my stupidity I made years ago.
What You Need Before Installing WordPress
Let’s keep this very simple. You need these:
A domain name (like yoursite.com)
Hosting with cPanel access (we’ll use Namecheap as example)
10–15 minutes of your time
A stable internet connection (please don’t attempt this on 2 bars of network 😅, just joking)
Once you have these, we’re good to begin.
Note: Most shared hosting from Web Hosting Providers like Namecheap, Truehost, already have cPanel installed on the webserver.
Step 1: Log Into Namecheap cPanel
First, log into your Namecheap dashboard.
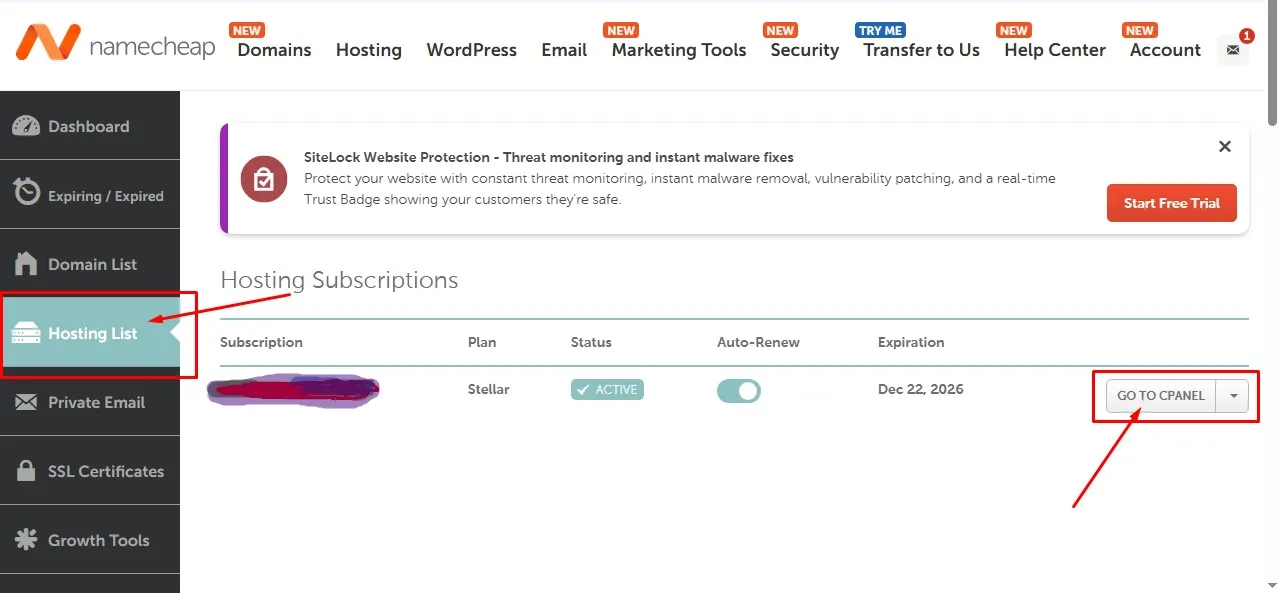
Go to hosting list, then you will see Go to cPanel button click it. After you click it you will see the cPanel dashboard.
Dashboard → Hosting List → Manage → Go to cPanel
Once inside, you’ll see a dashboard with tons of icons with labels.
Don’t panic okay, just relax.
You only need one section.
You might see it at the top section or you scroll down to find the name:
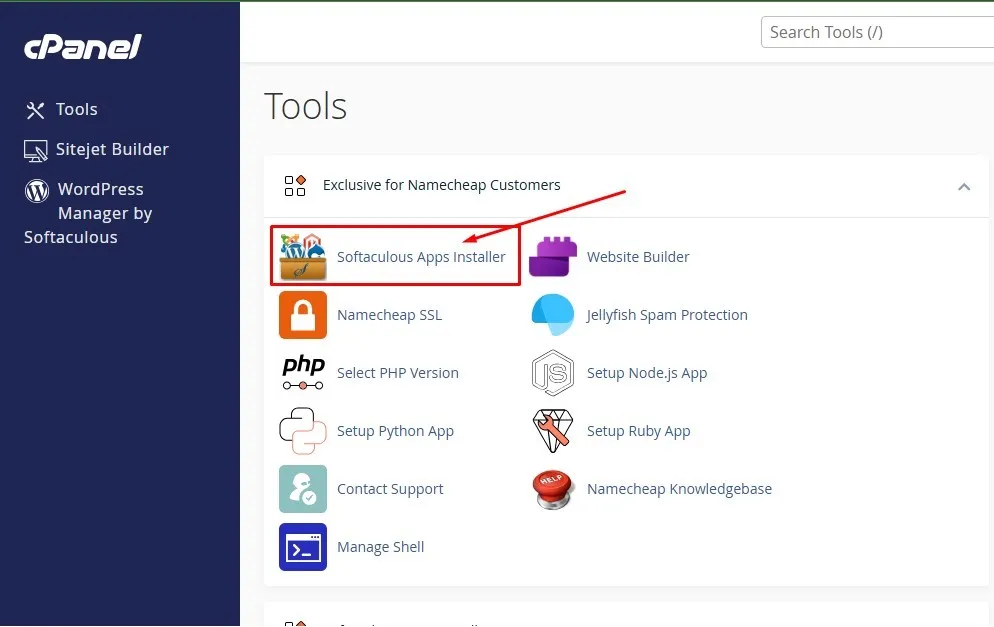
Softaculous Apps Installer
This is the magic button, click it.
Most hosting companies, including Namecheap, use Softaculous to make WordPress installation very easy.
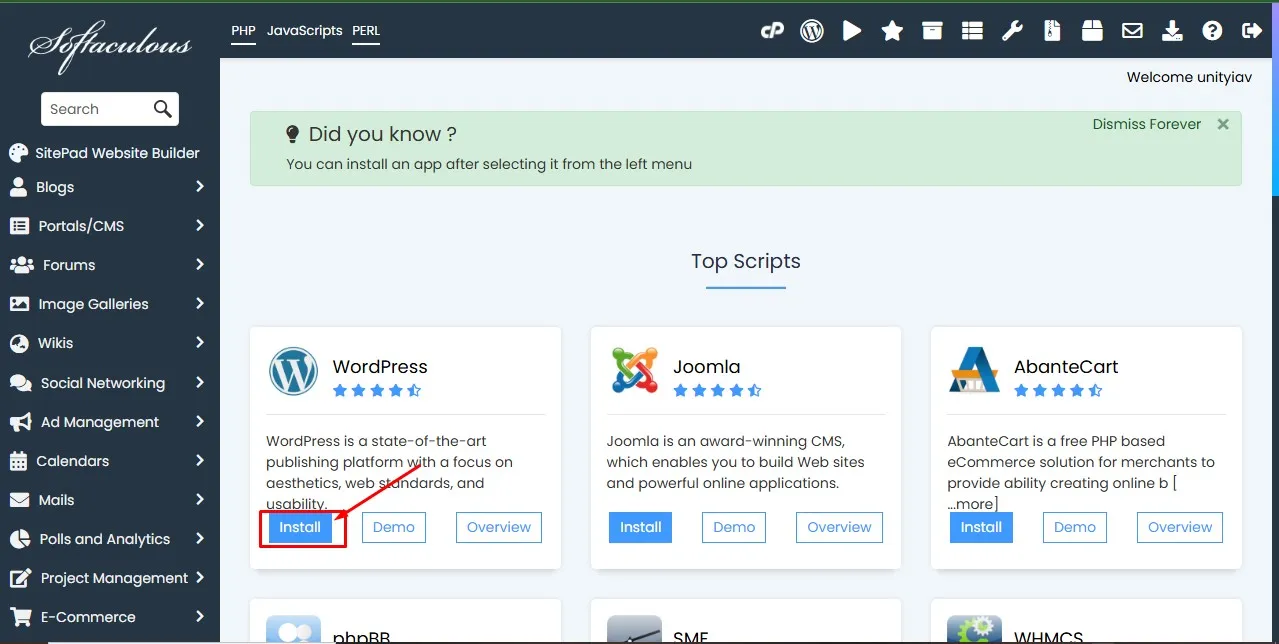
Click WordPress logo on the top menu of the Softaculous apps homepage.
Step 2: Click “Install Now”
After clicking WordPress logo, you might see an overview page explaining what WordPress is.
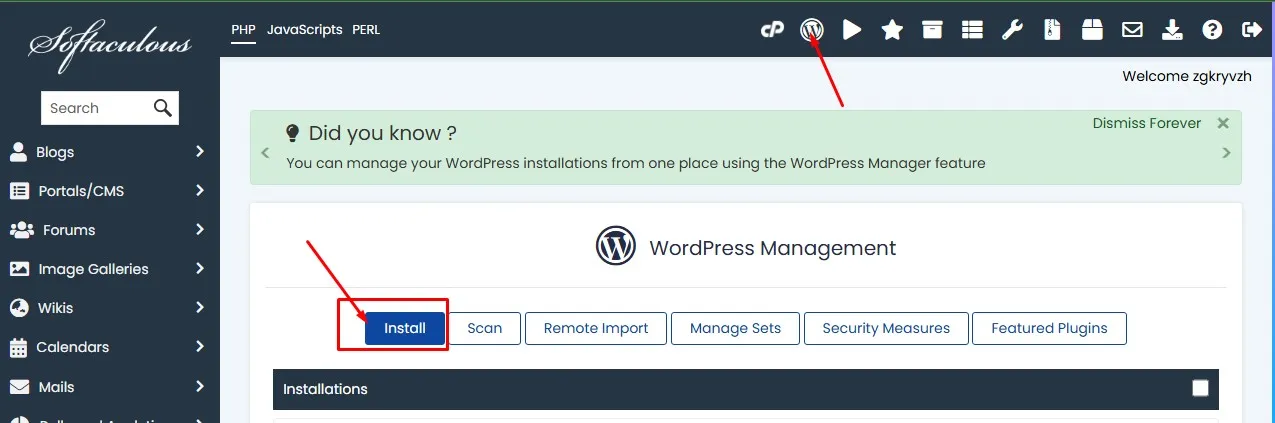
Ignore the essay.
Click the blue Install Now or Install button.
Now we next to the configuration part.
Step 3: Choose Installation Settings Carefully
This part is important. Don’t rush it, I will give you a simple explanation.
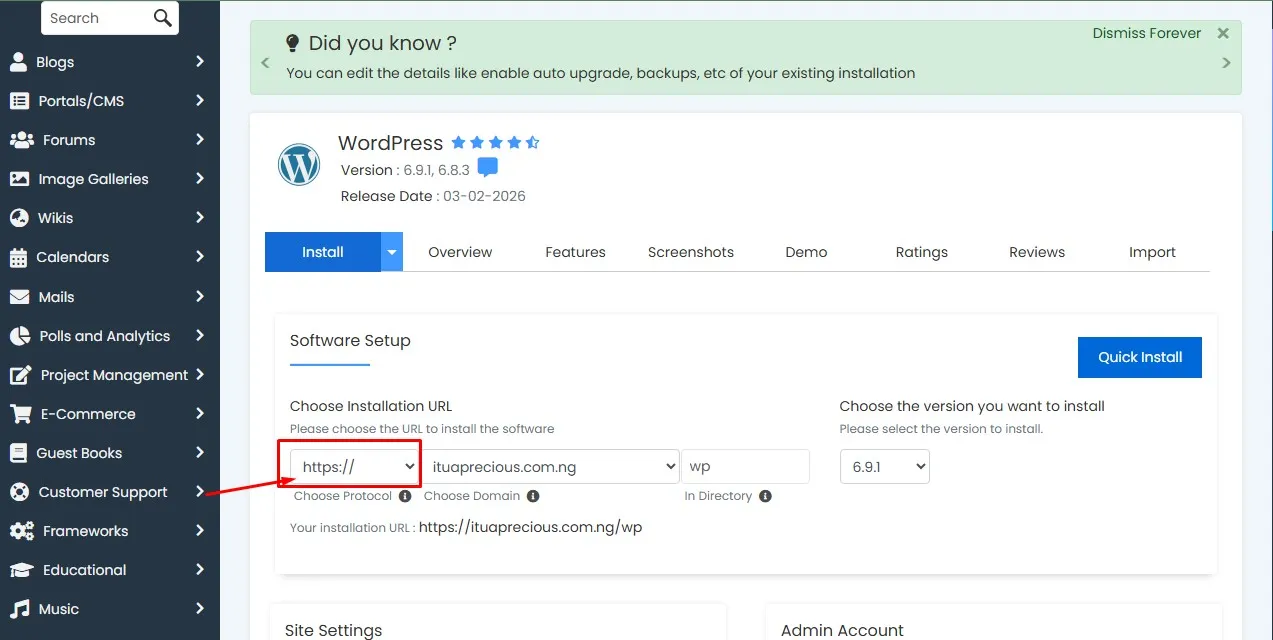
1. Choose Protocol
What you’ll see first are these options like:
http:// (http means Hypertext Transfer Protocol)
http://www. (www means the Word Wide Web)
https:// (https means Hypertext Transfer Protocol Secure)
Please always choose this one:
“https://”
Do you know why?
Because Google prefers secure sites. And if you’re serious about SEO (which you should be), SSL (Secure Sockets Layer) is not optional.
Most Namecheap, Truehost and Hostinger plans include free SSL. If yours isn’t active yet, activate it first before installing.
2. Choose Domain
Select the domain where you want WordPress installed.

If you only have one domain, it will be selected automatically for you.
3. In Directory (VERY IMPORTANT)
You’ll see a box that might contain “wp”.

Delete it.
Leave it empty.
If you leave “wp” there, your site will install as:
yoursite.com/wp
And trust me, beginners make this mistake a lot. I did too. And I had to reinstall everything again.
Leave it blank so your site installs on:
yoursite.com
Very clean and professional.
Please where they ask you Choose the version you want to install. Just leave it at the latest version.
Step 4: Site Settings
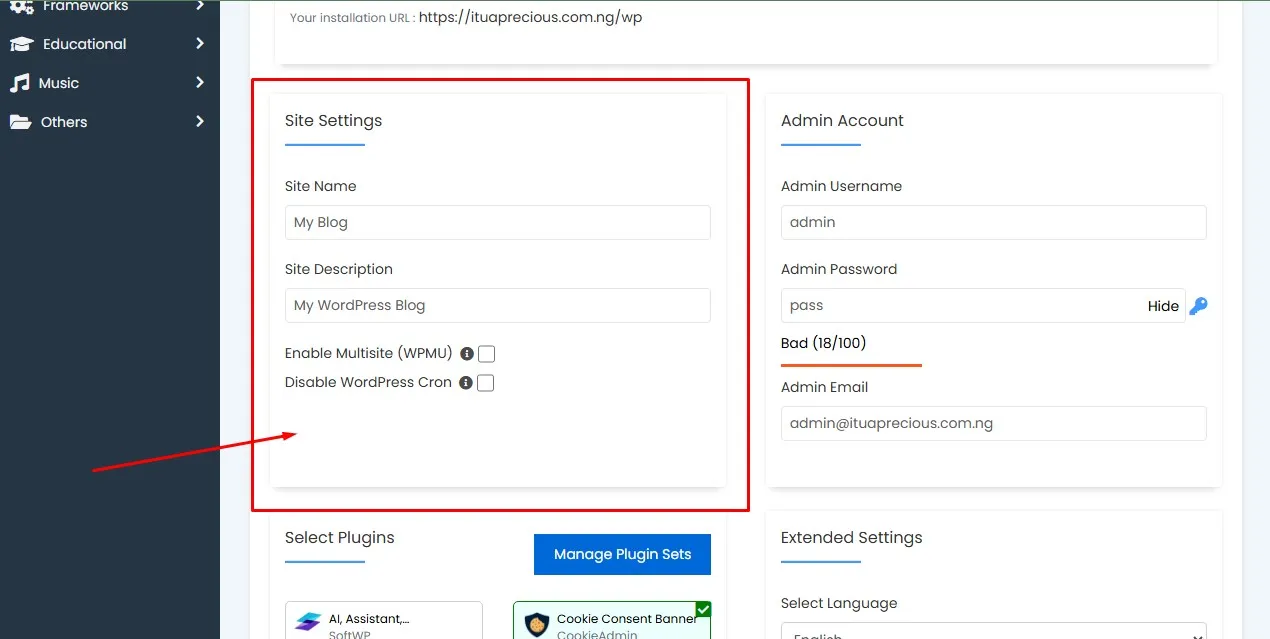
Now you’ll enter:
Site Name
Site Description
Don’t overthink this.
You can always change it later inside WordPress.
For example:
Site Name: First Guide 247
Tagline: Your guide to self discovery
Very simple.
Step 5: Admin Account Setup (Don’t Mess This Up)
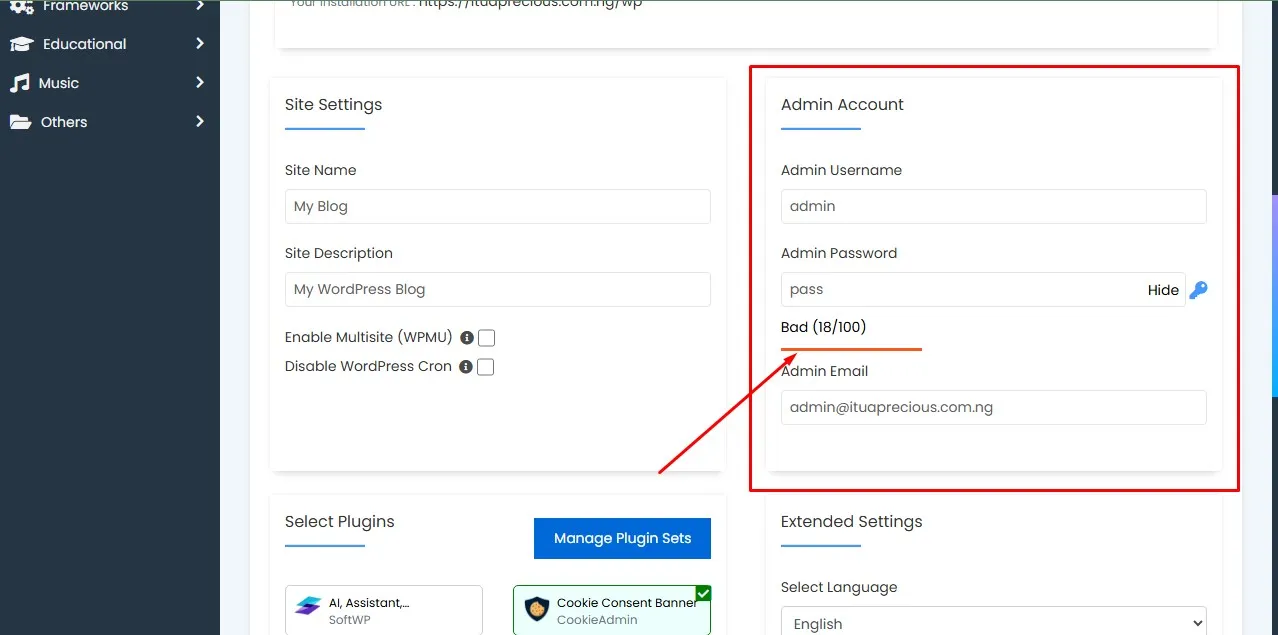
This is very critical.
You need to create:
Admin Username
Admin Password
Add Your Admin Email
You need these details to be able to login into your WordPress dashboard without going through your cPanel dashboard.
Please…
Do NOT use “admin” as username.
Hackers literally try “admin” first. I once tested this on a weak site and it got 43 login attempts in one day. Wild.
Use something unique.
For example:
Username: godstime247_admin
Strong password (use the generator)
Your real email address
This email is where password resets link go to.
Step 6: Default Plugins & Language
This is where you select plugins that will be installed automatically when you install the WordPress.
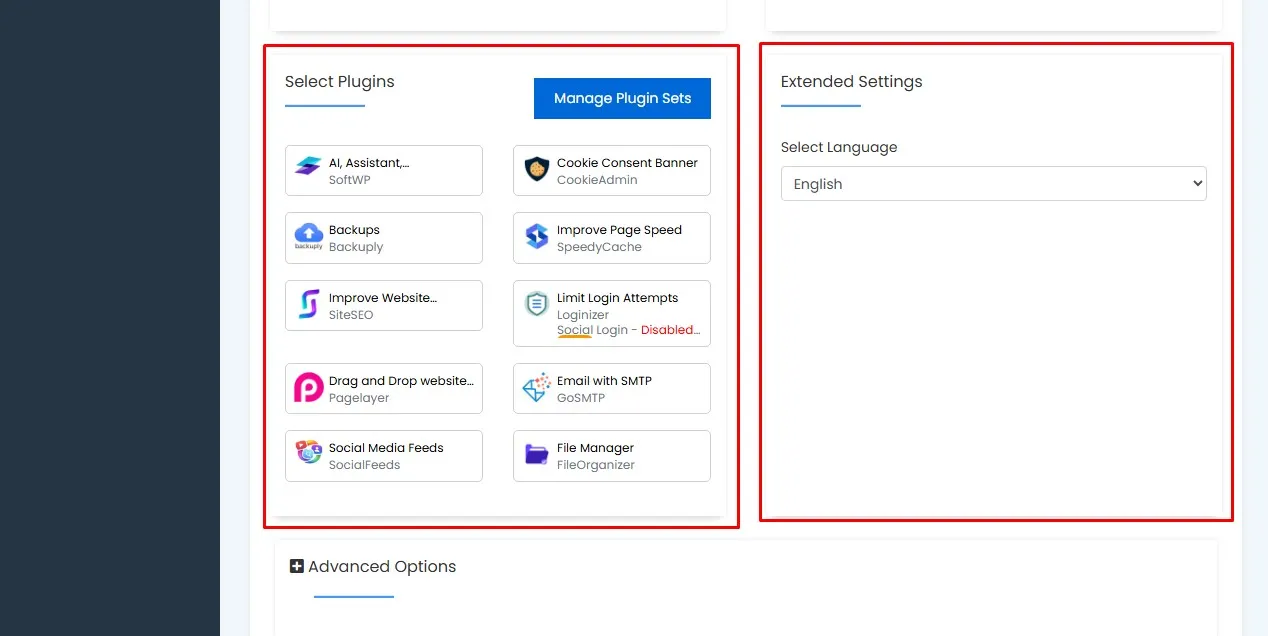
Don’t install any plugins yet, unchecked all the plugins. On the next tab, which is the language tab. You don’t have to do anything.
The language is already set to your default language.
Step 7: Advanced Options (Optional but Smart)
Click “Advanced Options.”
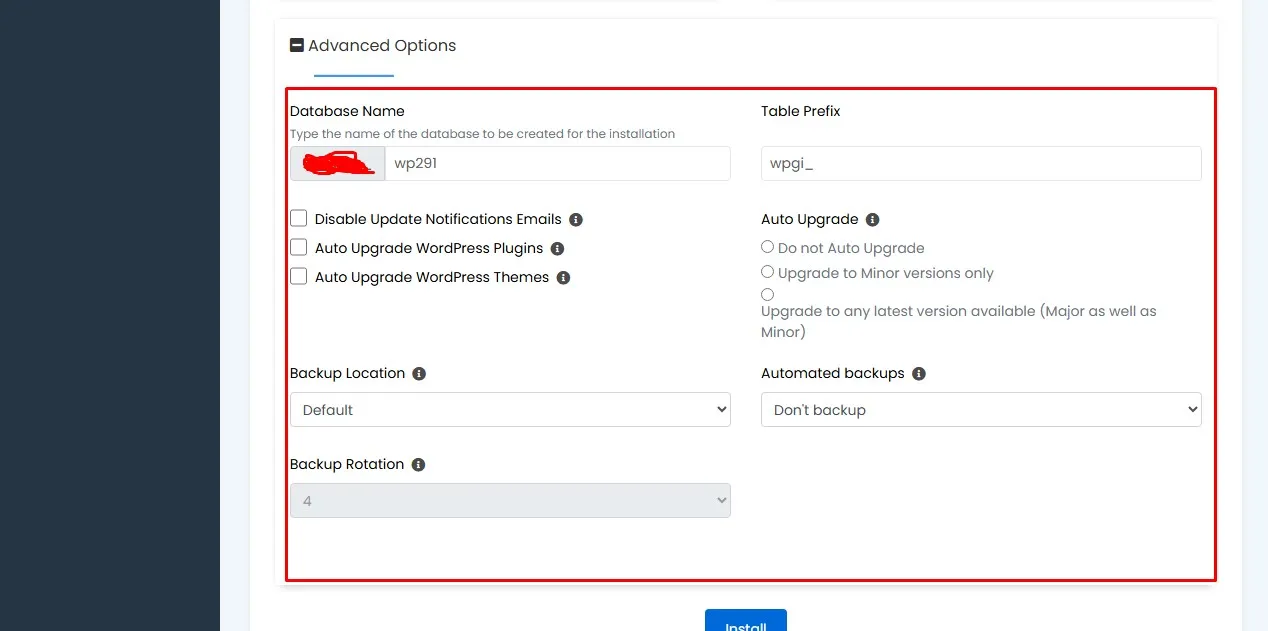
Here you’ll see:
- Database Name
- Table Prefix
- Auto Upgrade
- Backup Location
- Automated backups
- Backup Rotation
You can leave these as default.
But here’s a pro tip:
Change the table prefix from:
wp_
to something random like:
fg247_
It’s a small security improvement. Not bulletproof. But helpful.
Leave your backup location as default, so that the backups can be stored on your server. Set your automated backup on once a week and your backup rotation leave it at 4.
Step 8: Click Install
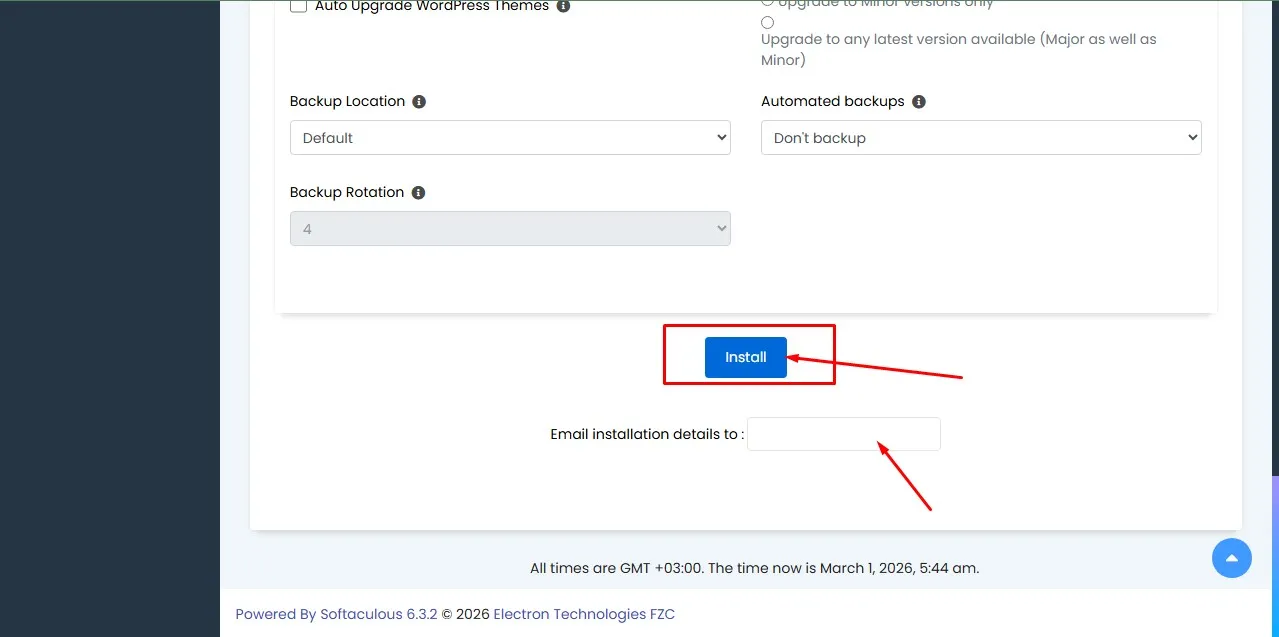
Scroll down.
Before you click the install button, you will see the “Email installation details to”. Add your email address there so that the installation details will be sent there. But this is optional.
Click Install.
Wait 30–60 seconds.
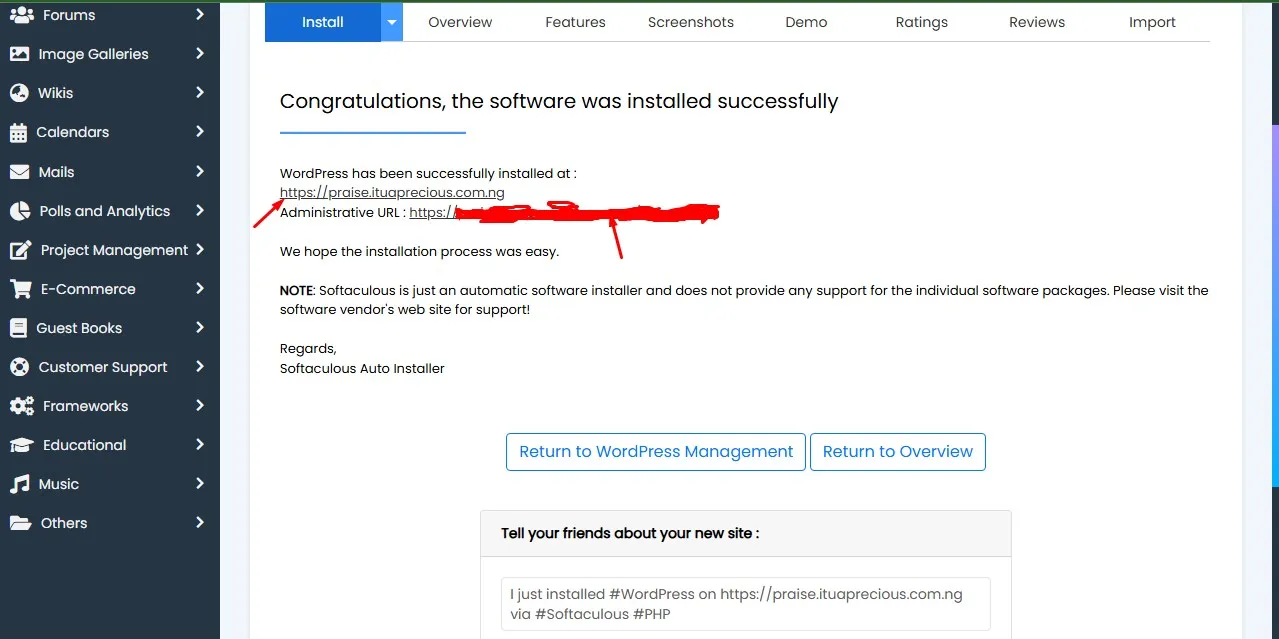
Boom.
WordPress installed successfully.
You’ll see two links:
Your website URL
Your admin URL (yoursite.com/wp-admin)
Click the admin link.
Log in.
Welcome to WordPress. You will see your WordPress dashboard.
Alternative Method: Manual WordPress Installation (Advanced)
Now let’s talk about the “real” way.
This is how we installed WordPress before Softaculous became a popular software.
And honestly? Knowing this saved me when Softaculous failed on a client server in 2020.
Here’s the manual process:
Step 1: Download WordPress
Go to WordPress official website.
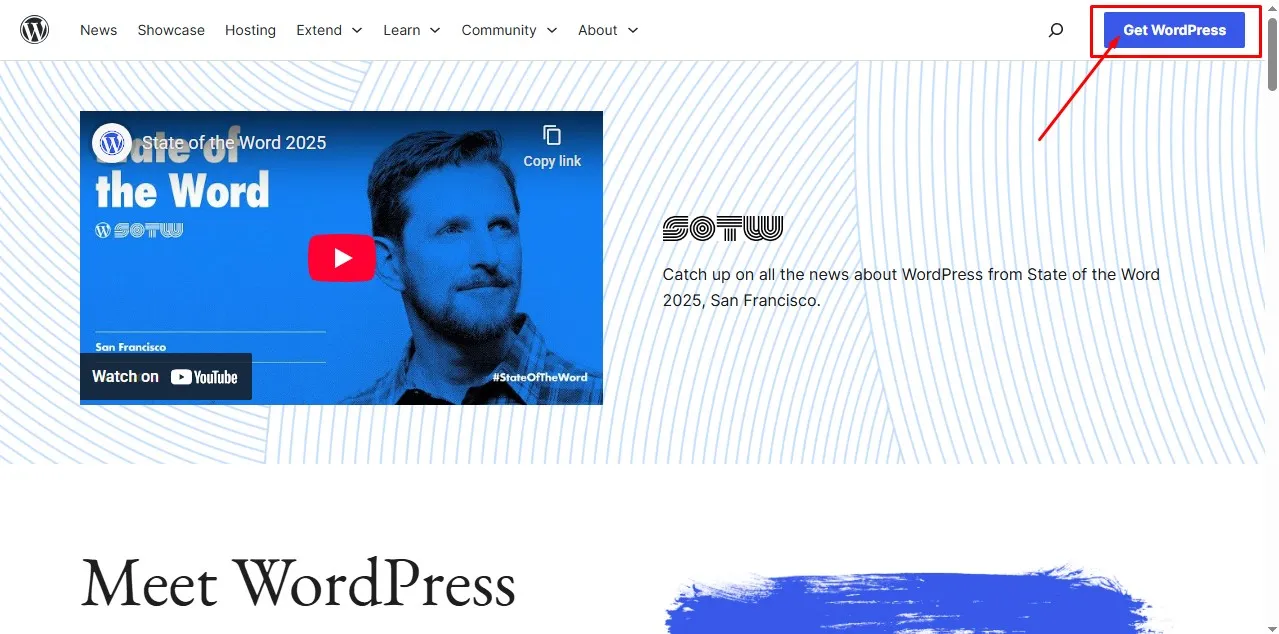
Download the latest version.
Step 2: Upload via File Manager
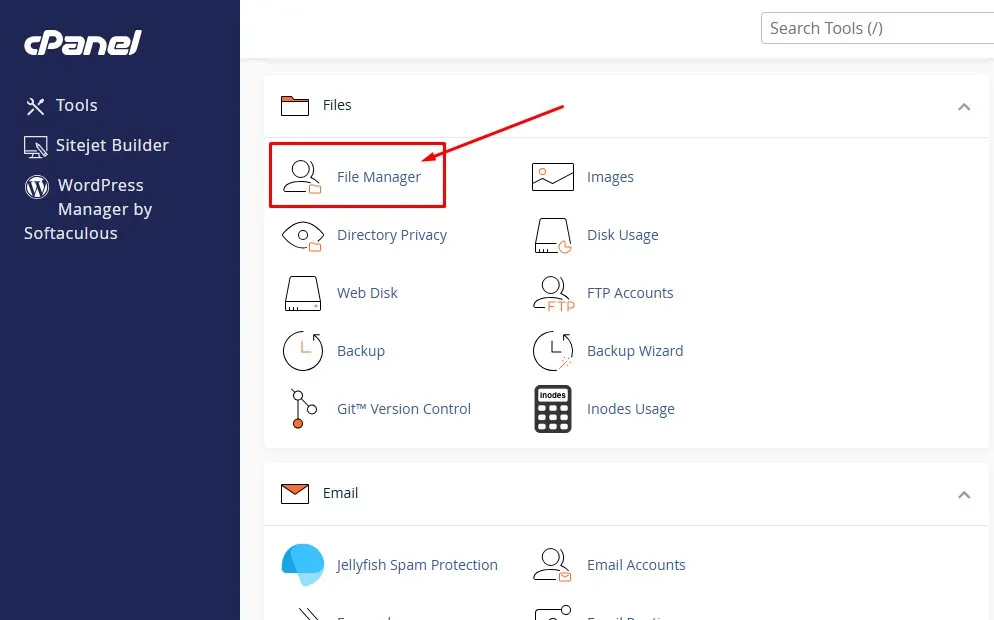
In cPanel:
Go to File Manager → public_html
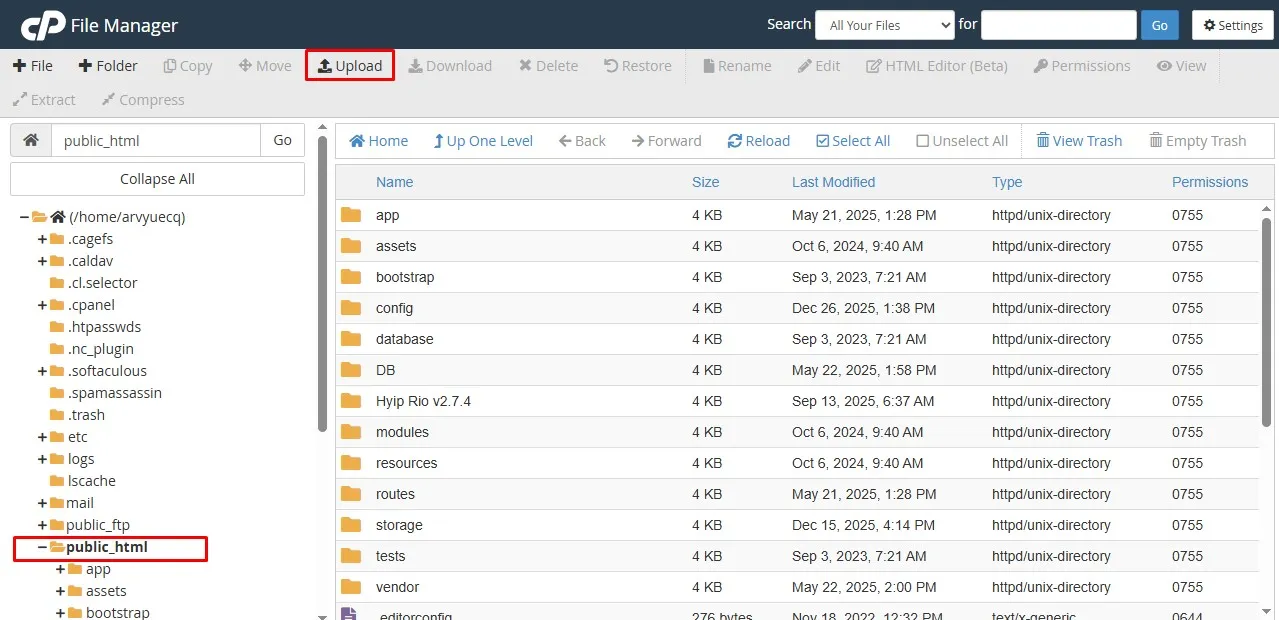
Upload the WordPress ZIP file.
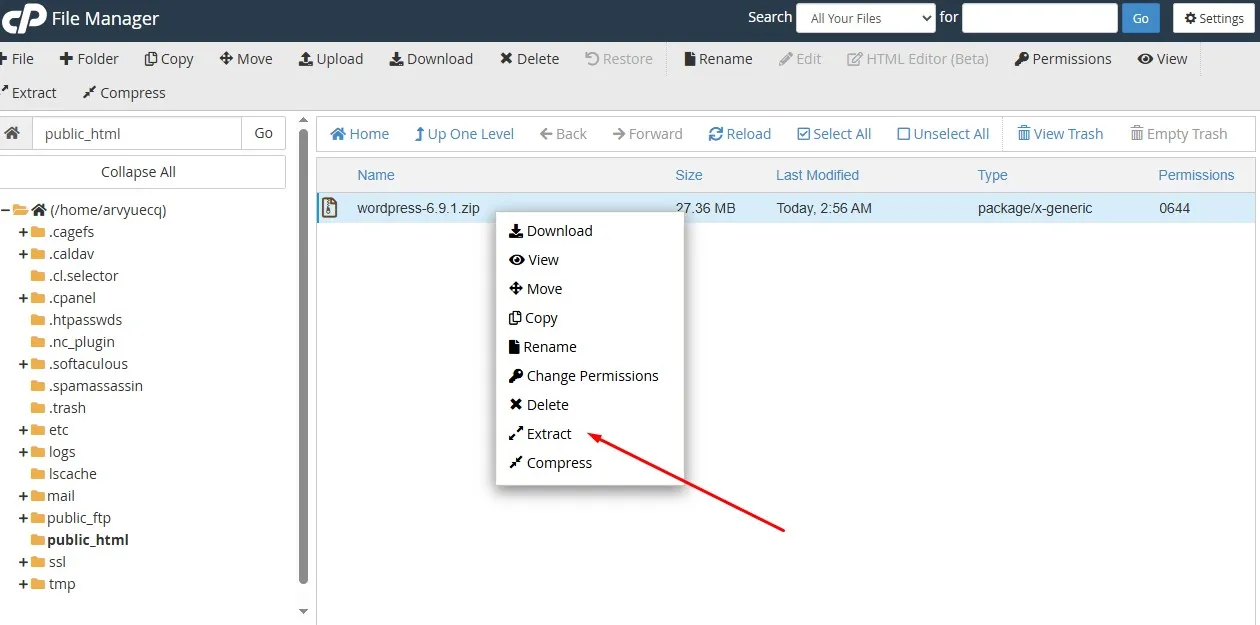
Extract it.
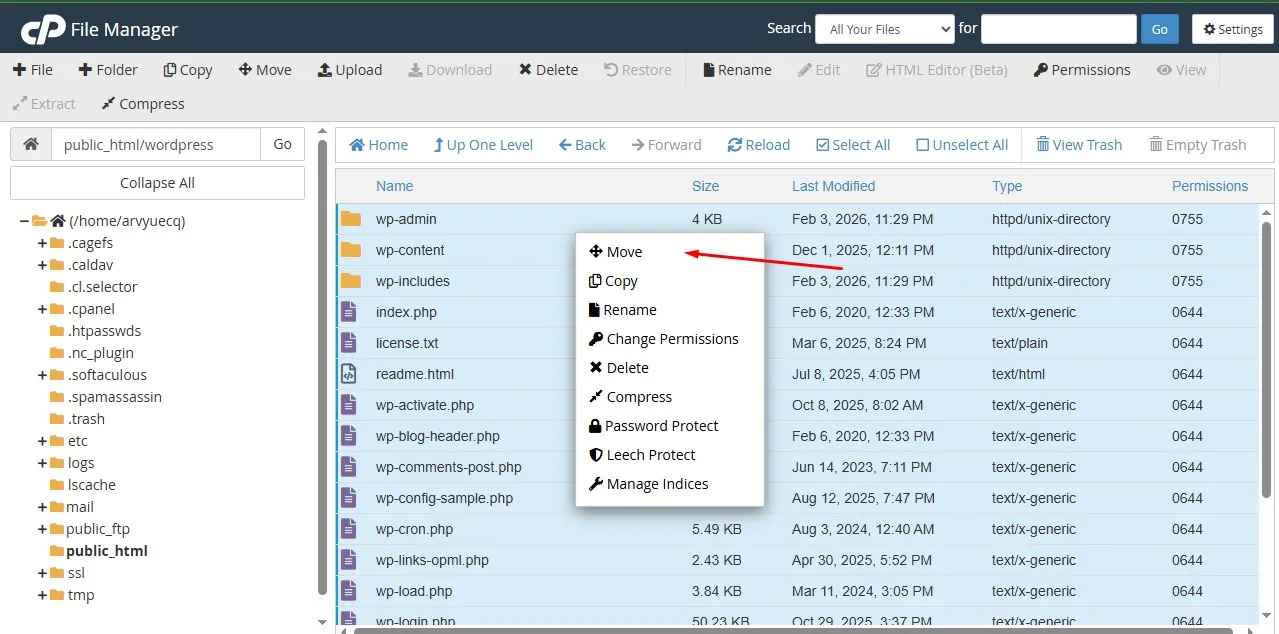
Move files from the “wordpress” folder into public_html.
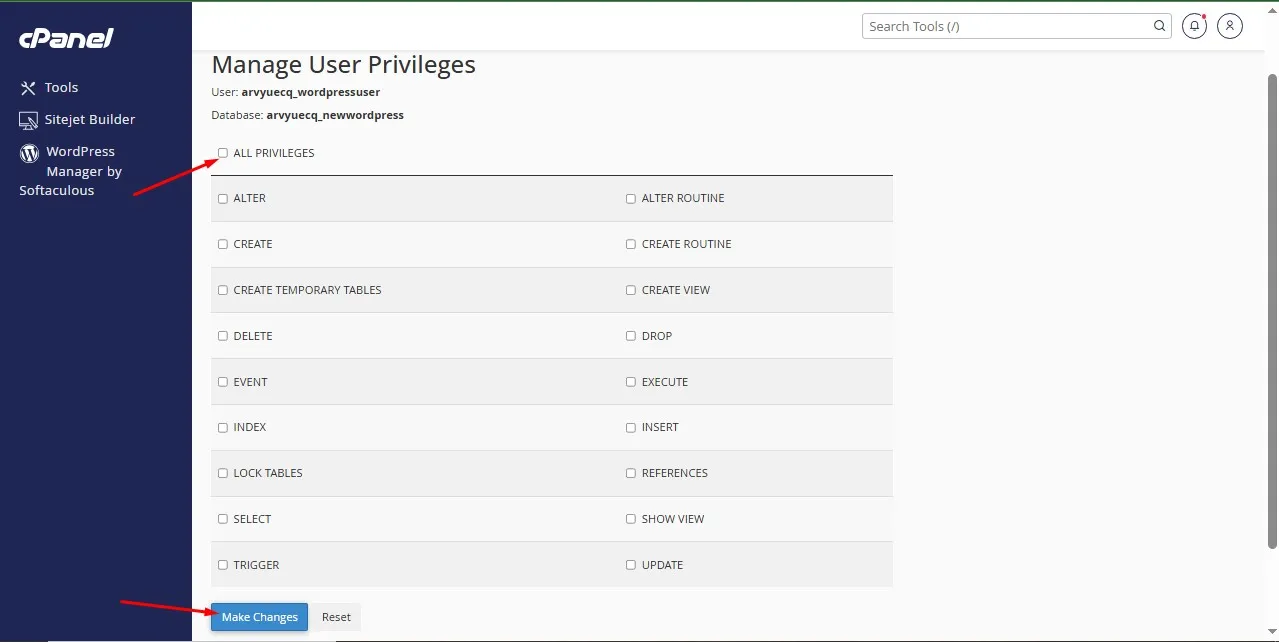
Step 3: Create a Database
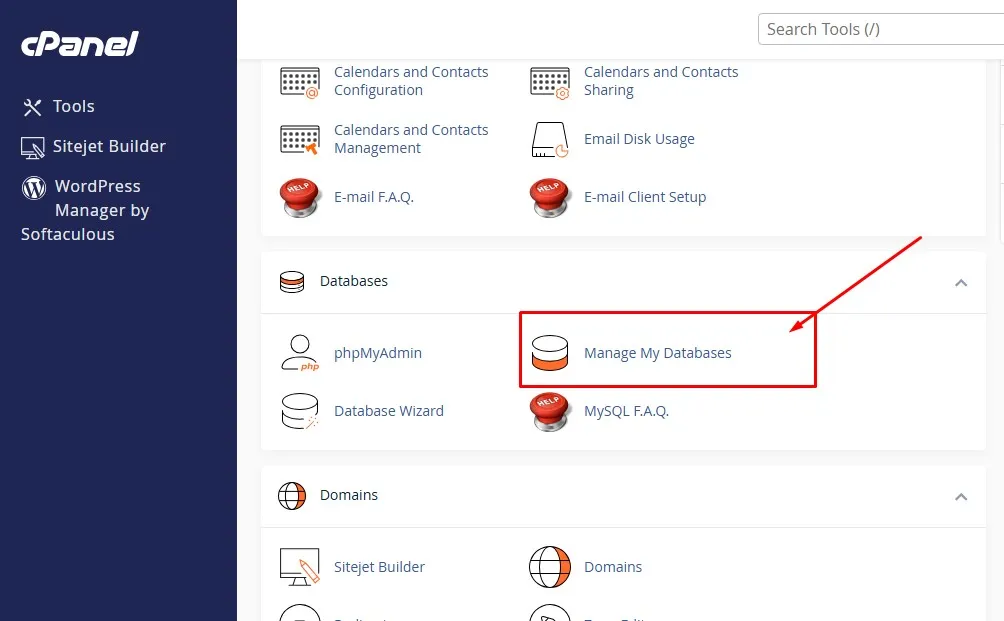
In cPanel:
Go to MySQL Databases
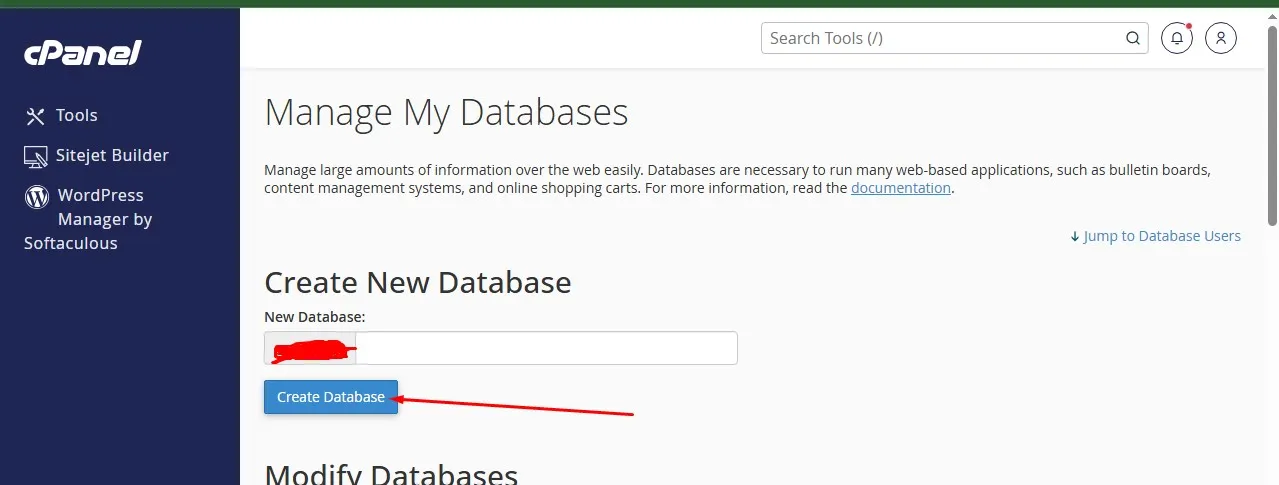
Create:
New database
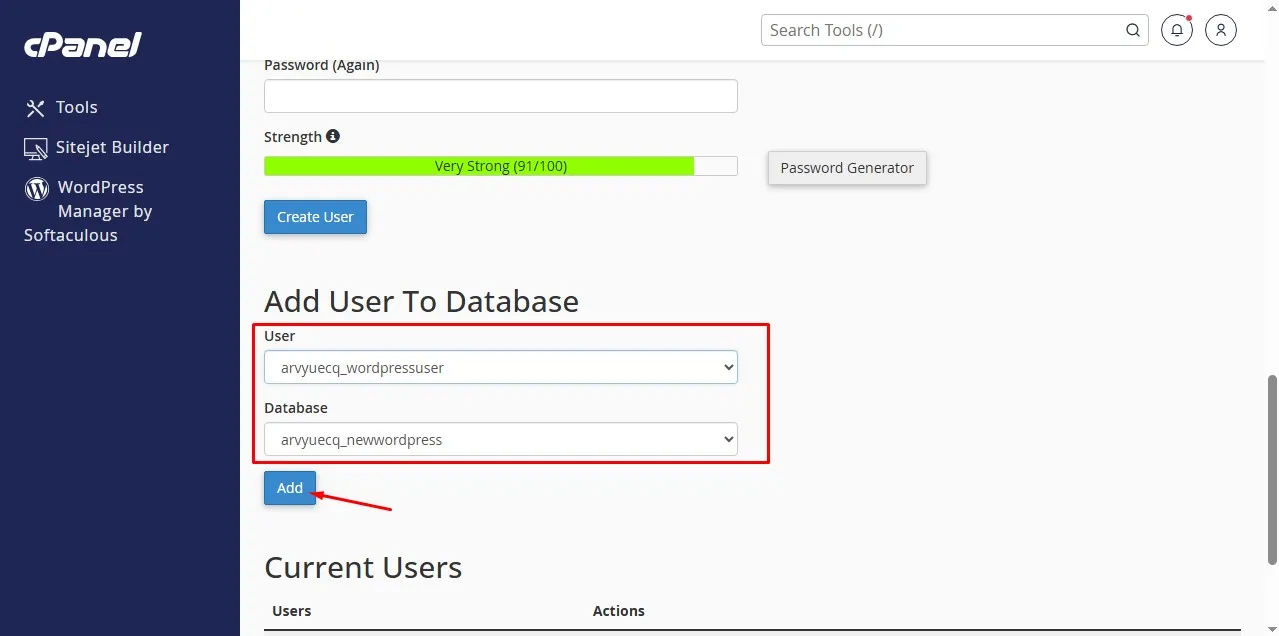
New database user
Assign user to database
Grant all privileges
Write down your:
Database name
Username
Password
If you lose this, you’ll suffer. Ask me how I know. Keep the detail safe you will need them later.
Step 4: Run WordPress Installation Wizard

Go to:
yourwebsite.com
You’ll see the setup screen.
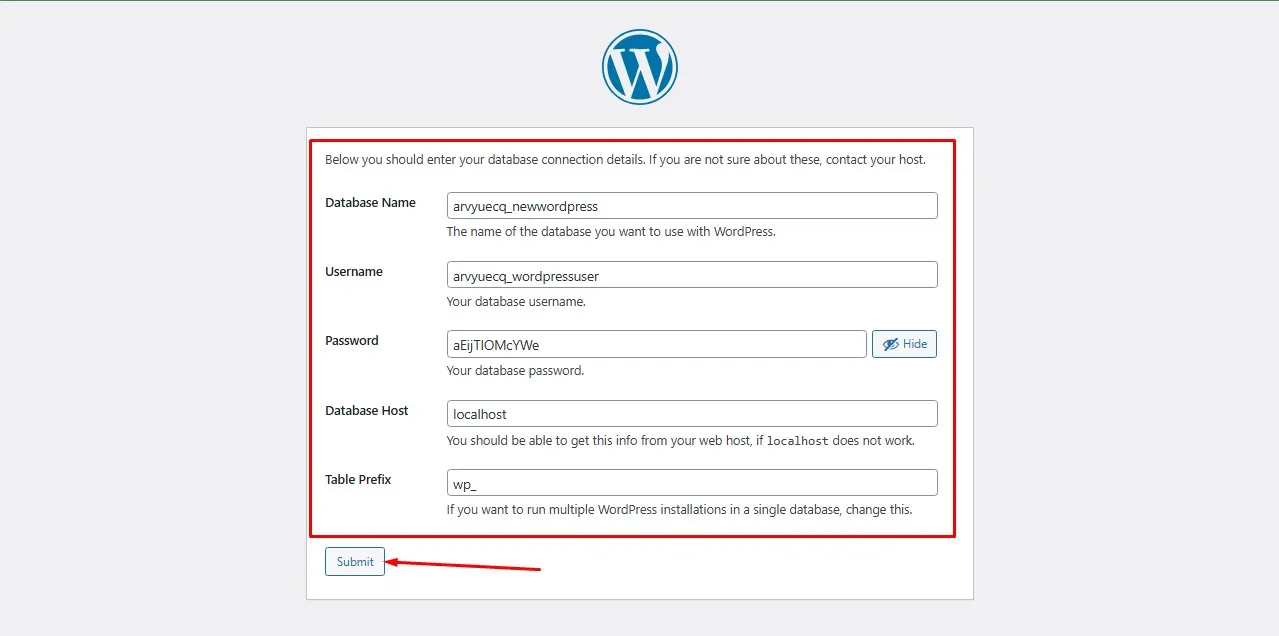
Enter:
Database name
Username
Password
Localhost (as database host)
- Table Prefix
Click submit.
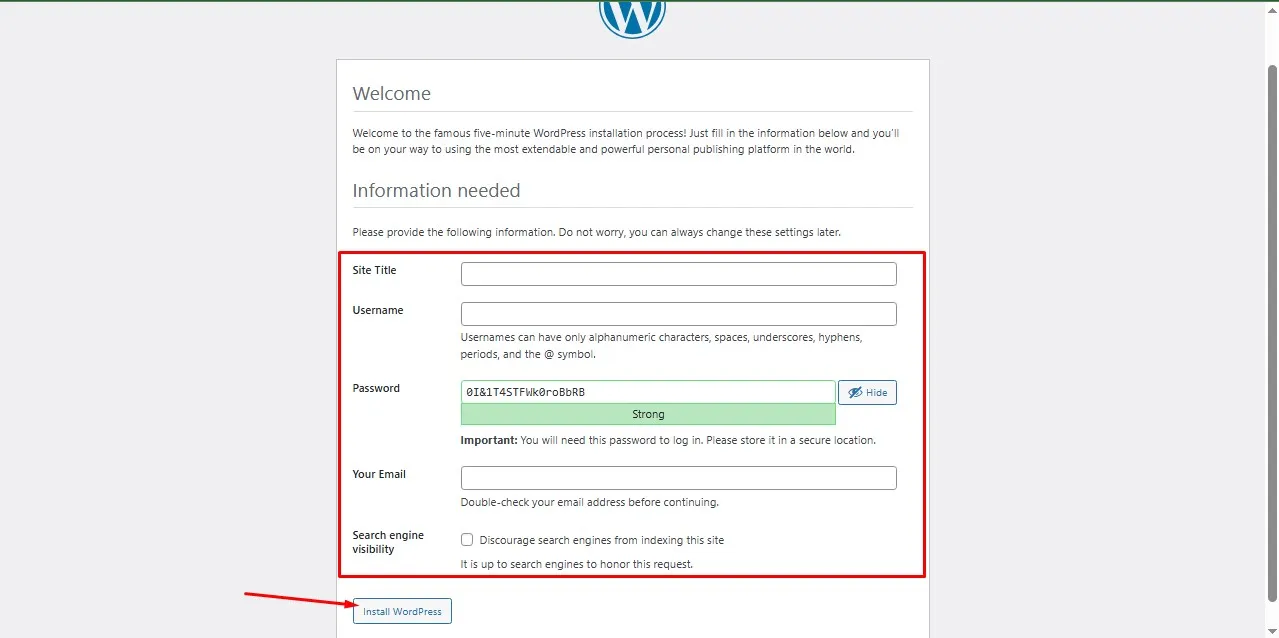
Then create your admin account.
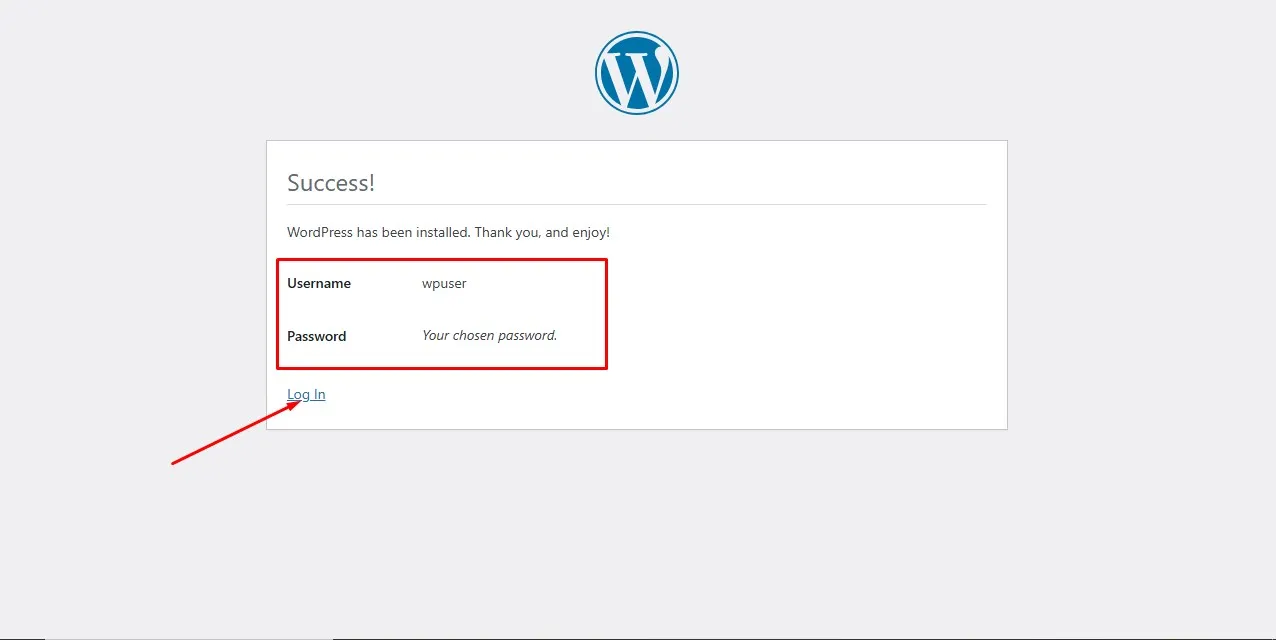
Done. Login into your WordPress dashboard.
Common Mistakes Beginners Make
Let me save you from frustration and stress.
1. Installing WordPress Before Connecting Domain
If your domain isn’t pointing to Namecheap nameservers yet, your website won’t load.
Wait for DNS propagation (usually 30 mins – 24 hours).
2. Forgetting SSL
Installing WordPress without SSL means later you’ll struggle with mixed content errors.
Activate SSL first.
3. Weak Passwords
In 2023 alone, WordPress had over 90,000 brute-force attempts per minute globally. That’s not drama. That’s reality.
Protect your WordPress admin login.
4. Installing Multiple Times
Some beginners install WordPress 3 times on the same domain because they think it “didn’t work.”
Then they wonder why the site is broken.
Install once. Be patient.
After Installing WordPress, What Next?
Don’t just stare at the dashboard.
Here’s what I do immediately after every install:
1. Delete Default Content
Delete “Hello World” post
Delete default page
Delete unused themes
Clean environment = clear head.
2. Install Essential Plugins
I usually install:
SEO plugin (All in one SEO or Yoast plugin)
Security plugin (Admin and Site Enhancements (ASE), Loginizer, and Honeypot Anti Spam)
Caching plugin
Not 27 plugins. Keep it lean. Don’t install plugins you don’t need.
I once worked on a website with 42 plugins installed. It loaded in 9.3 seconds. Slow down the website, Google hated it.
3. Set Permalinks
Go to:
Settings → Permalinks → Post Name
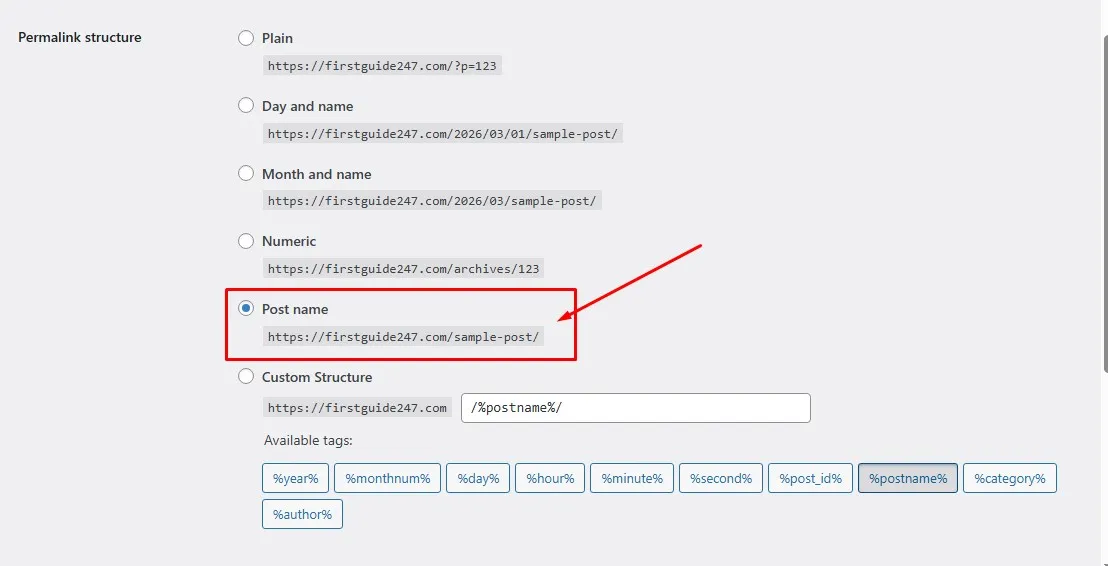
This makes your URLs SEO friendly.
Instead of:
yoursite.com/?p=123
You get:
yoursite.com/how-to-install-wordpress
There is a big difference between the two.
Personal Lesson: My First WordPress Disaster
Let me confess something.
My first WordPress install? I installed it manually at 11:00pm at night.
Was very sleepy and overconfident.
I forgot to write down the database details and the WordPress admin login details.
Closed my laptop.
Came back next morning.
Locked out.
I had to reinstall everything again, I was pissed out on myself.
That day taught me something:
Slow down and always double-check. Then you document important details. I usually use Lightshot app in my pc to screenshot things I don’t want to forget.
So as you follow this guide, don’t rush.
Why WordPress + cPanel Is Still the Best Combo
Even with website builders everywhere, I still prefer WordPress on cPanel hosting. Here is my
Why?
Full control
Unlimited monetization
No platform restrictions
Scalable
Over 40% of websites online run on WordPress. That’s not hype. That’s dominance of the web space.
And once you understand how to install it yourself? You’re no longer a beginner.
You’re dangerous. In a very good way.
My Final Thoughts
Installing WordPress on cPanel, especially using Namecheap, is not hard.
It just looks scary at first. But it’s very simple.
Follow the steps:
Login to cPanel
Use Softaculous
Configure properly
Secure your admin
Install
Clean up
That’s it.
If you’re building your online business, this is your first real technical step. And once you conquer it, you’ll realize something powerful:
You can build this.
You don’t need a developer for everything.
If you’re serious about growing your blog or online business, you should also read:
How to Choose the Best Hosting for Your Blog
Beginner’s Guide to Making Money with WordPress
Start installing. Stop procrastinating.
And if you get stuck? Breathe. I have probably made that mistake too already and survived it. Ask me any question you may have in the comment section and I will be happy to assist you. Until next time, see you in the next post.