

Hey, welcome to my blog. My name is God’s time, let’s guess something very important.
I know you have bought your domain name. Maybe something clean like yourbrand.com. You’re excited. Website is already built. You’re very serious about this online business you are starting.
But you’re still sending business emails from yourbusinessname@gmail.com
Hmm Ouch. I have been there.
Back in 2017, I pitched a web design project to a client using a Gmail address I created for my business. He replied and I still remember this “Do you have a professional business email?”
That one sentence humbled me and I felt stupid.
Because here’s the truth: people judge your seriousness by your email address. Is that fair? Maybe not. Do is happen? Absolutely.
Today, I’m going to show you exactly how to create a professional custom email address using:
- cPanel from Namecheap
- hPanel from Hostinger
“Note: Most cPanel look very much alike, so even if you’re not using Namecheap web hosting you can still use this guide.“
No fluff. No confusion. Just practical, step-by-step simple guidance from someone who has messed this up before and learned the hard way.
By the end of this guide, you’ll have something like:
- info@yourdomain.com
- support@yourdomain.com
- admin@yourdomain.com
And you’ll look 10x more credible overnight.
Why You Need a Custom Email Address (And Why Gmail Isn’t Enough)
Let me break this down in simple term.
For example when someone sees:
godstime@gmail.com
They think freelancer. Maybe hobbyist.
But when someone sees:
godstime@firstguide247.com
They think brand. Authority. Structure.
I once ran a small test with my blog subscribers (around 50 people at the time). I sent the same proposal twice. One from Gmail, while one from my domain email. Was the open rate difference?. Yeah roughly 14% higher on the custom domain email.
Coincidence? Maybe.
When it comes to online perception is everything.
And if you’re building a serious business. Whether it’s blogging, eCommerce, web design, or even your a beauty brand like oritim.com, this is non-negotiable.
Alright, now let’s get into the practical stuff.
How to Create a Custom Email Address Using cPanel (Namecheap Hosting)
If you’re hosting with Namecheap’s shared hosting plans, you’re most likely using cPanel.
And honestly? cPanel is old school. But it works very well. It’s powerful. It’s reliable.
Here’s how to do it.
Step 1: Log Into Your Namecheap Account
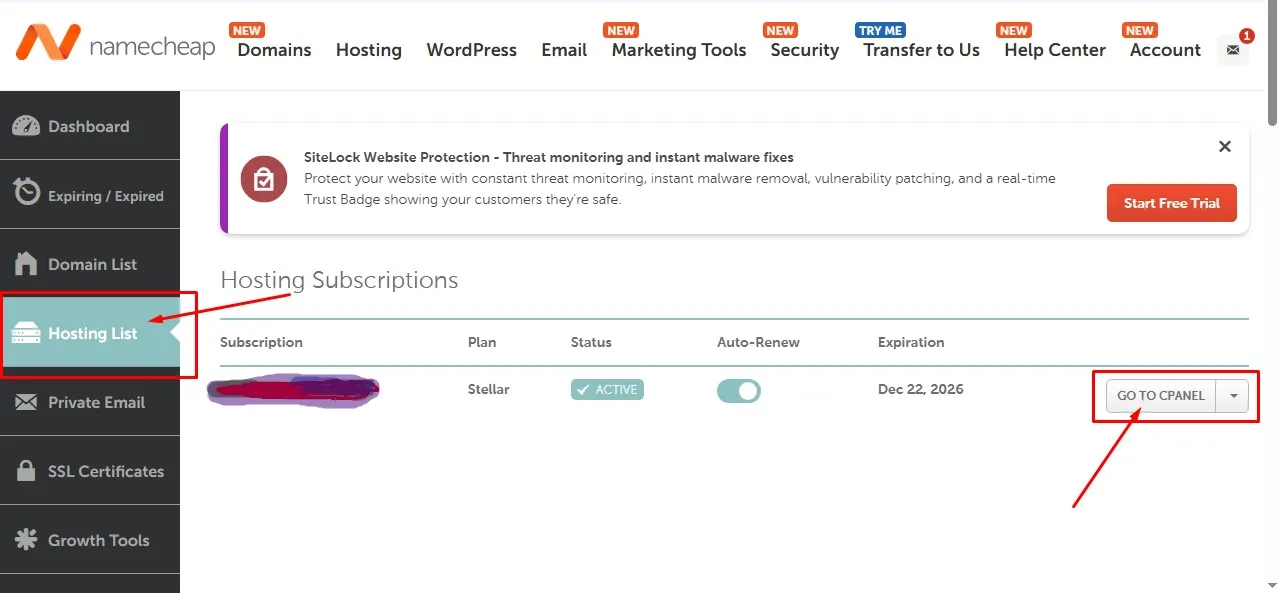
- Go to Namecheap.
- Log into your dashboard.
- Click on Hosting List.
- Click Manage next to your hosting plan.
- Click Go to cPanel.
Boom. You’re inside cPanel.
The interface might look like it was designed in 2008. Don’t panic. We’re not staying long.
Step 2: Find the “Email Accounts” Section
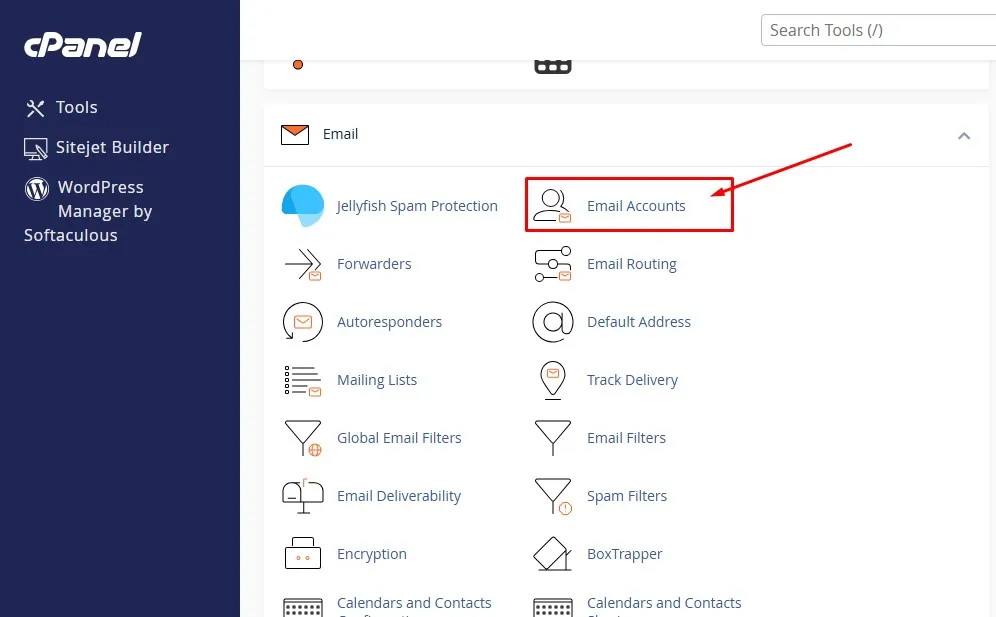
Scroll down until you see the Email section.
Click on Email Accounts.
That’s where the magic happens.
Step 3: Create the Email Account
Now you’ll see a button that says Create.
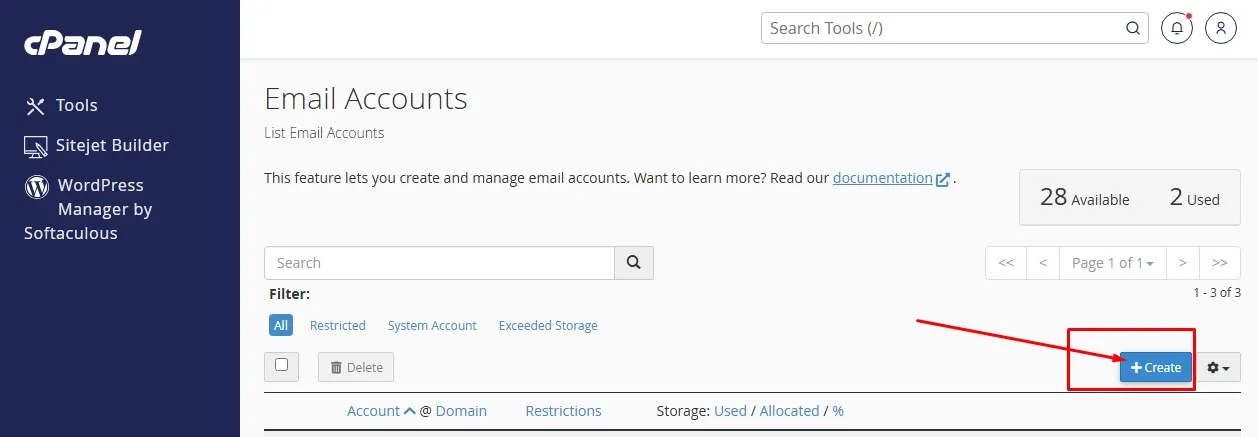
Click it.

You’ll need to fill in:
- Domain – Choose your domain name.
- Username – For example: info, support, admin.
- Password – Make it strong. Not “123456”. Please.
Pro tip: I once used a weak password and my email got spammed within 48 hours. Lesson learned. Use a password generator to get stronger password.
After filling everything out:
You can click the optional setting to increase the storage space but don’t put it on unlimited. You can put maximum 1gb for your email.
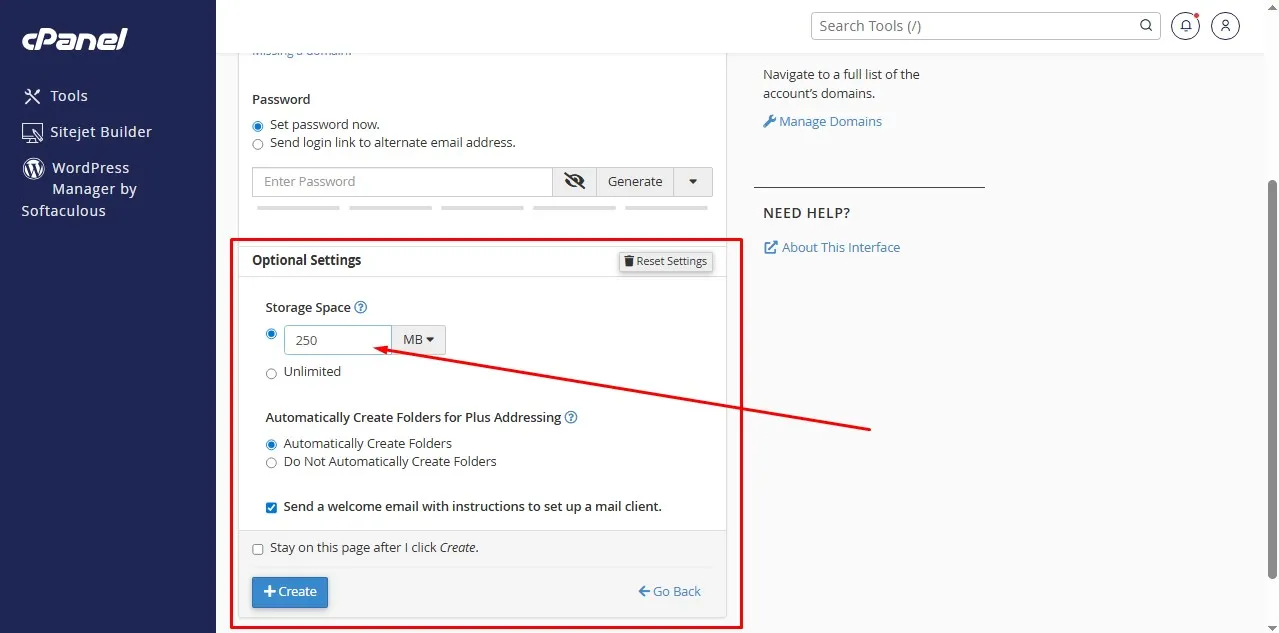
- Leave the Automatically Create Folders selection.
- Check the box that has this writeup “Send a welcome email with instructions to set up a mail client”.
- Uncheck the box that has this writeup “Stay on this page after I click Create”.
Click Create.
Done.
Yes. It’s that simple.
Step 4: Access Your Email
Now you have options.
You can:
- Use Webmail (directly inside cPanel)
- Connect it to Gmail
- Connect it to Outlook
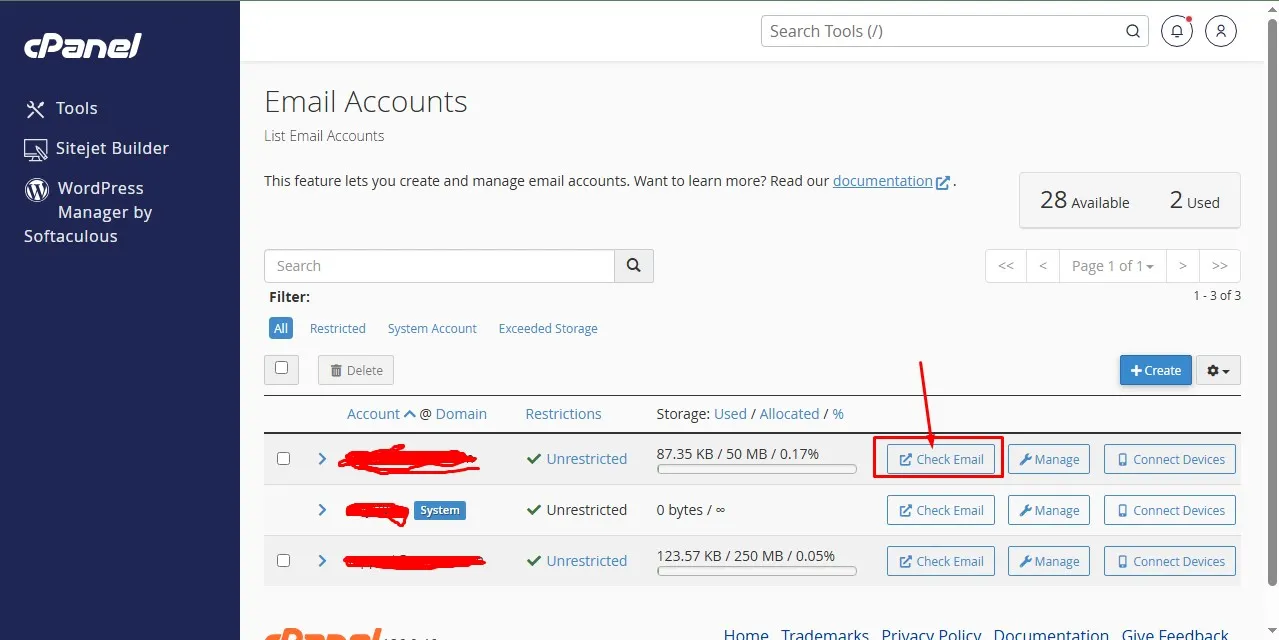
To access via webmail:
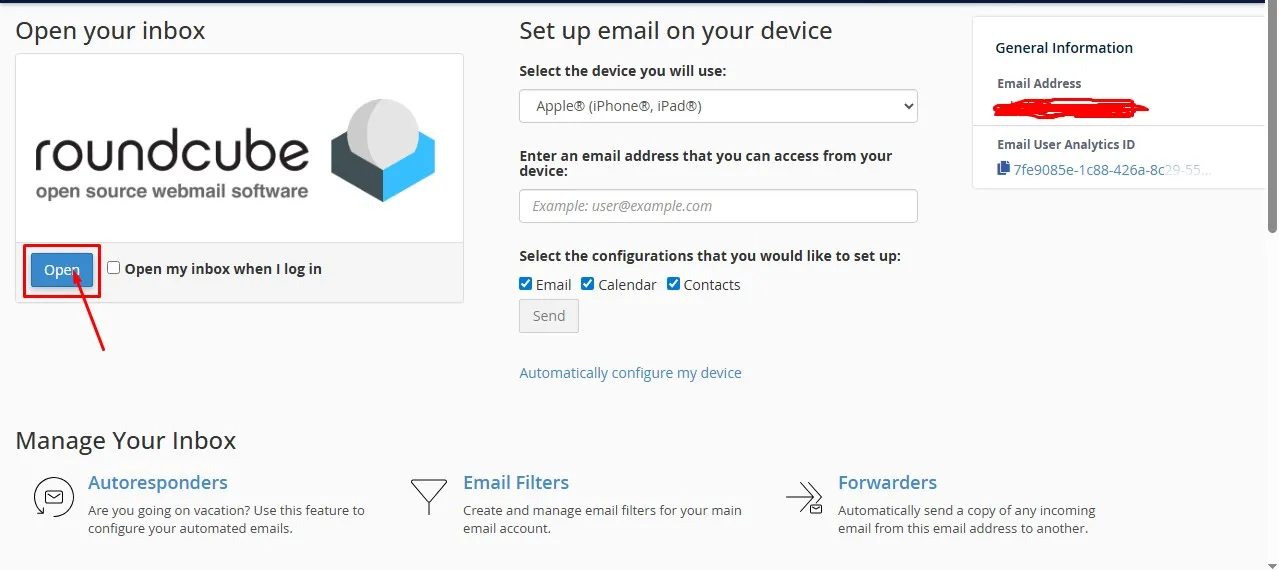
- Go back to Email Accounts.
- Click Check Email.
- Choose Roundcube (most common option).
You’re in.
Step 5 (Optional But Smart): Connect Your Domain Email to Gmail
This is one I personally use.
Why?
Because logging into webmail daily is annoying.
Instead, I forward everything to Gmail and send emails from my Gmail using my custom email address.
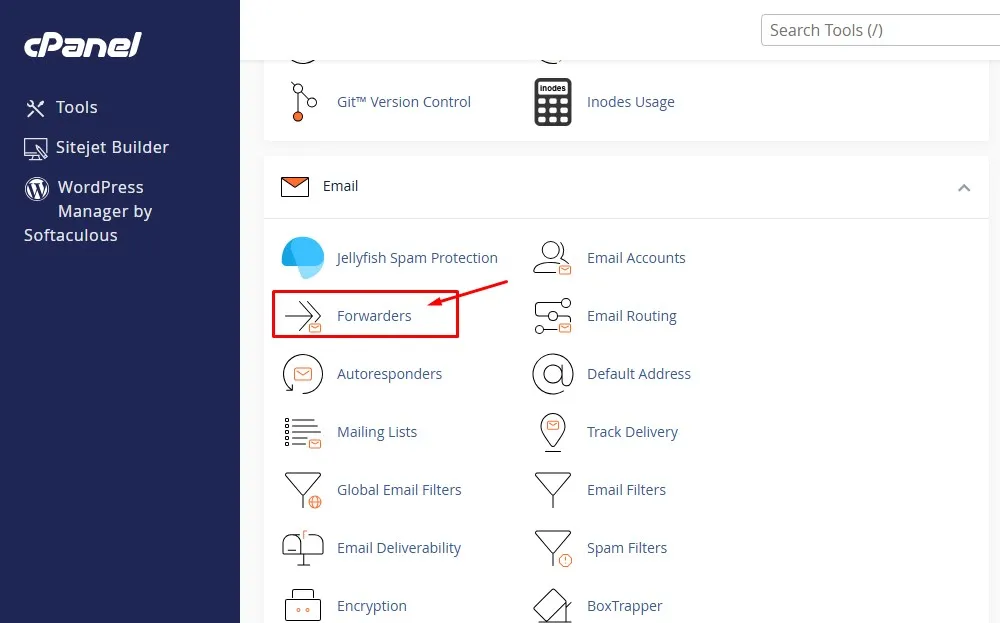
Inside cPanel:
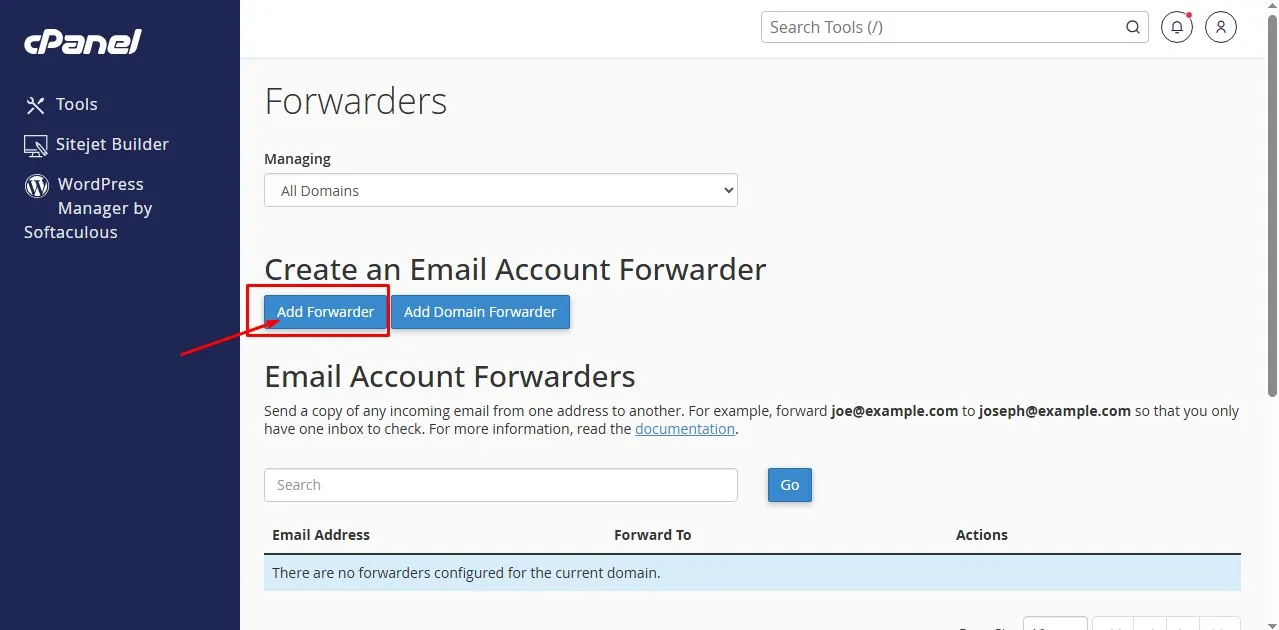
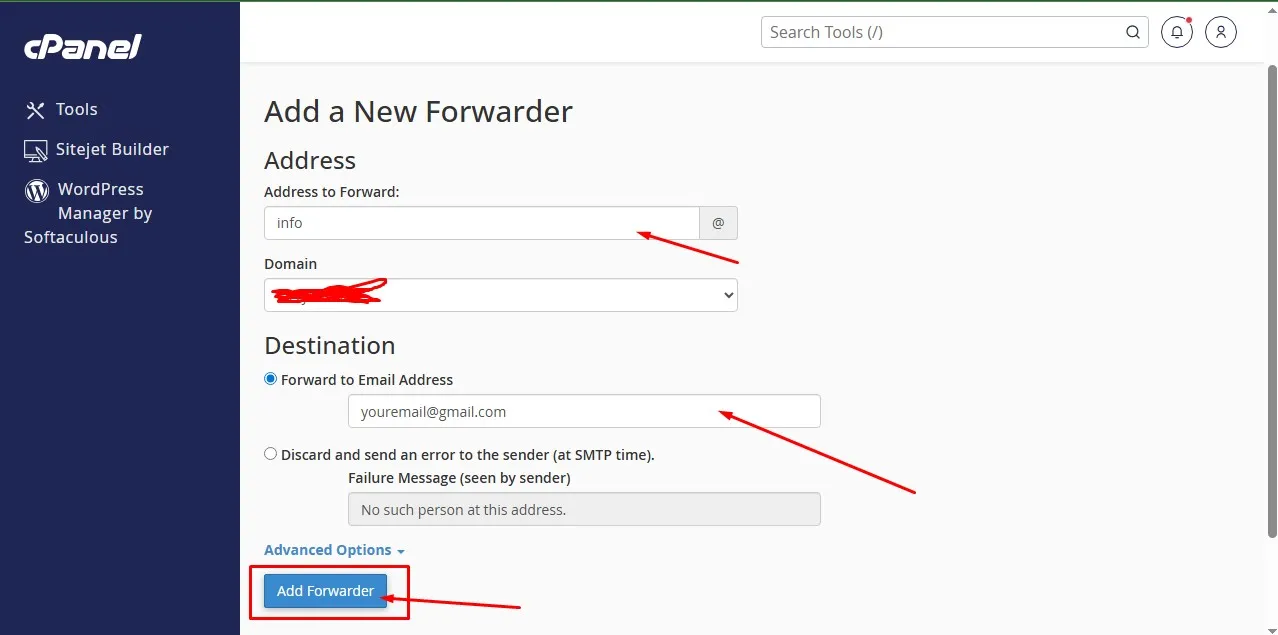
- Go to Forwarders.
- Add a forwarder.
- Enter your custom email.
- Forward to your Gmail.

Then inside Gmail:
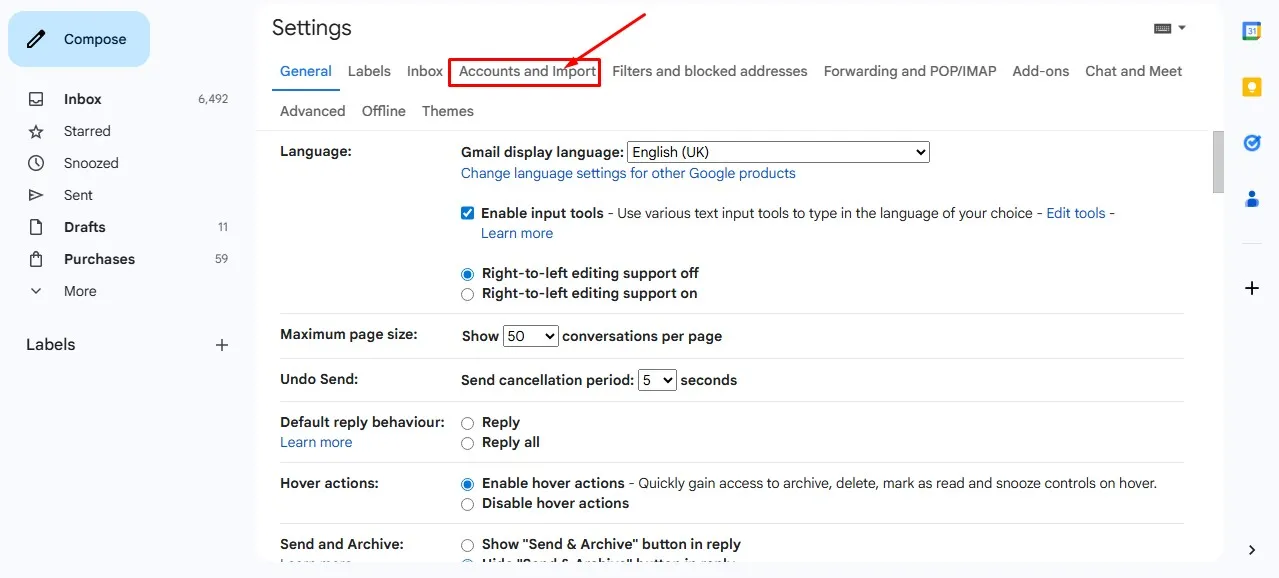
- Go to Settings

- Click all settings
- Accounts and Import
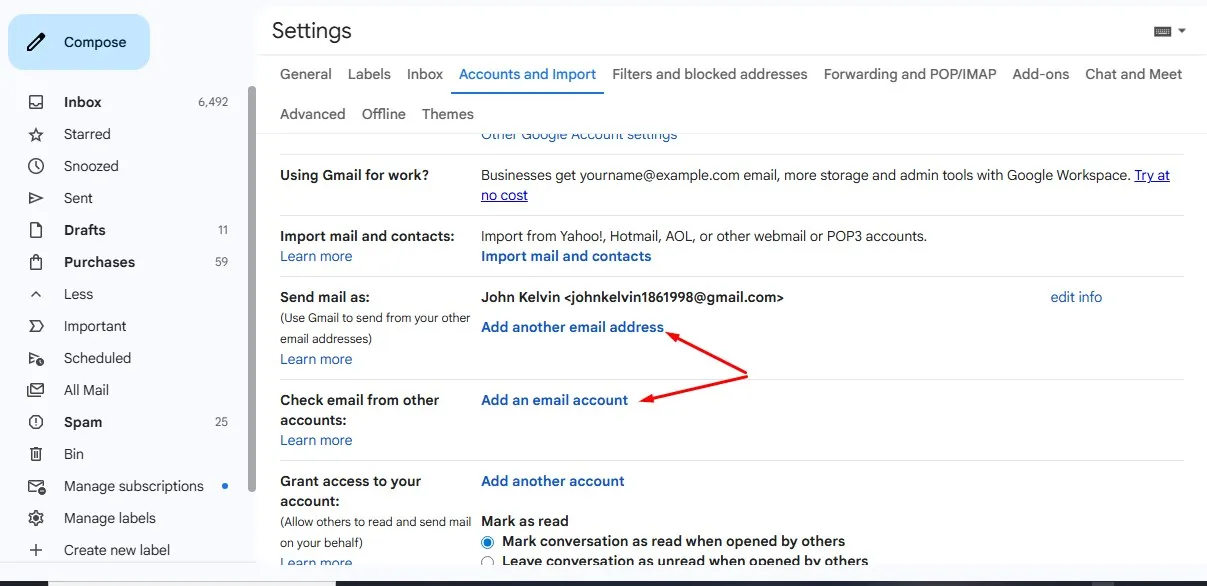
- Add another email address
Enter your custom domain email and follow the SMTP setup instructions provided in cPanel.
It takes 5–10 minutes max.
Now you get Gmail convenience with professional branding.
Best of both worlds.
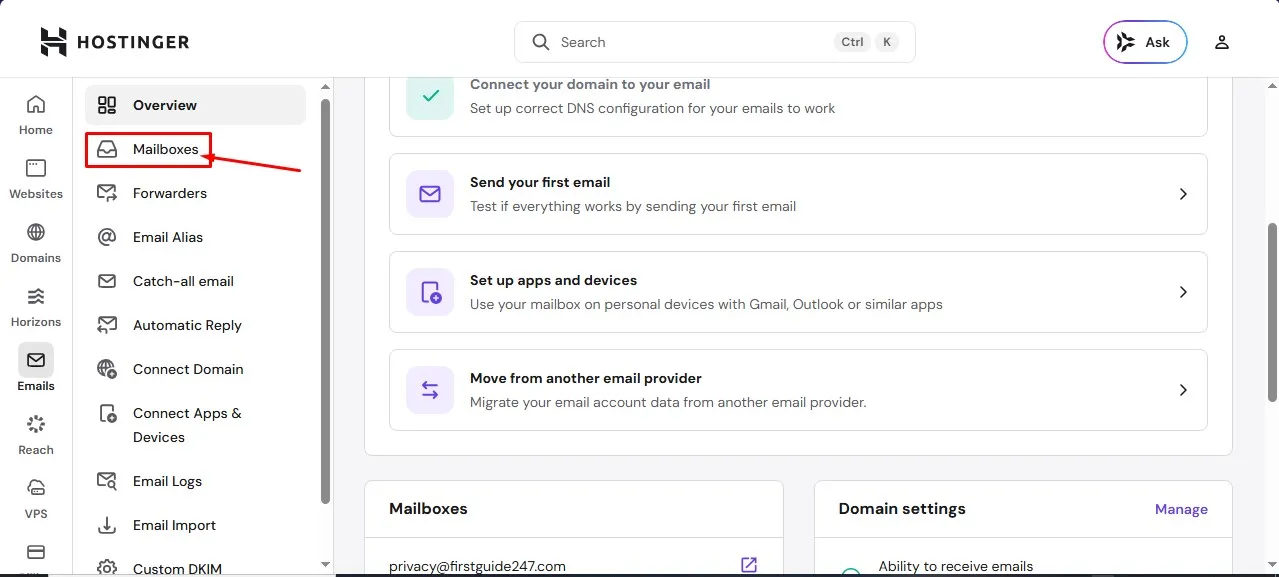
How to Create a Custom Email Address Using hPanel (Hostinger)
Now let’s talk about Hostinger.
Hostinger doesn’t use cPanel. They use hPanel, their own custom dashboard.
Honestly? It’s cleaner. More beginner-friendly. Less overwhelming.
If you’re new, you might actually prefer this.
Step 1: Log Into Hostinger
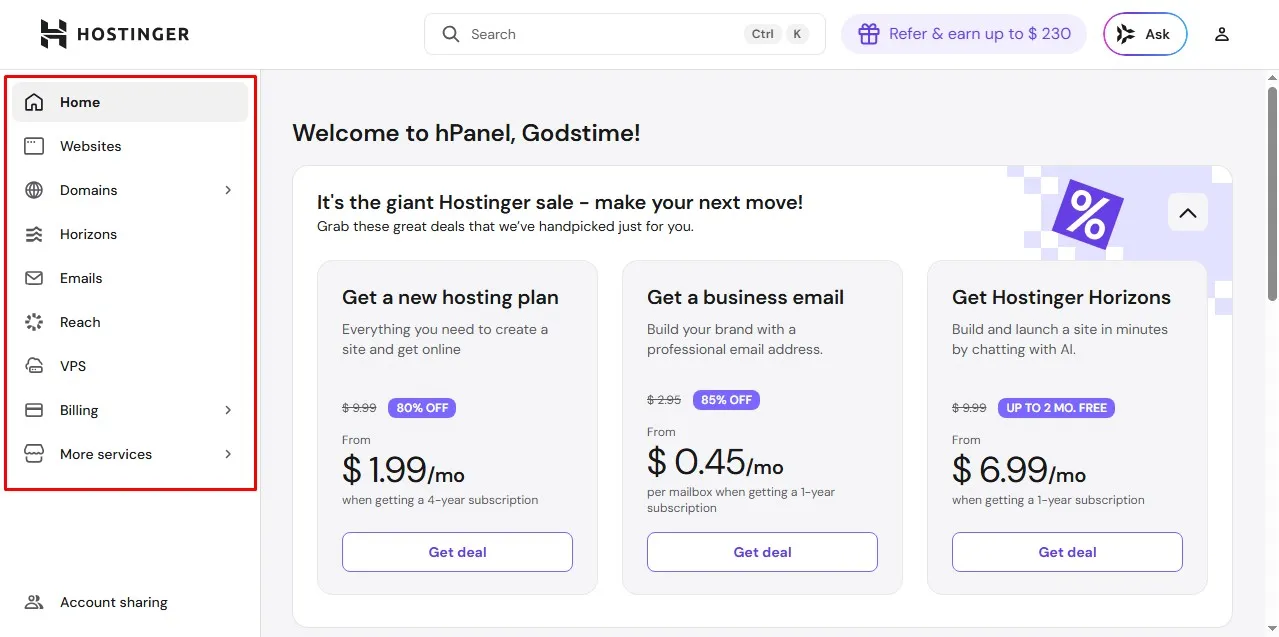
Go to Hostinger Website.
Log into your dashboard.
Click on Websites.
Click Manage next to your domain.
Now you’re inside hPanel.
Step 2: Go to Emails Section
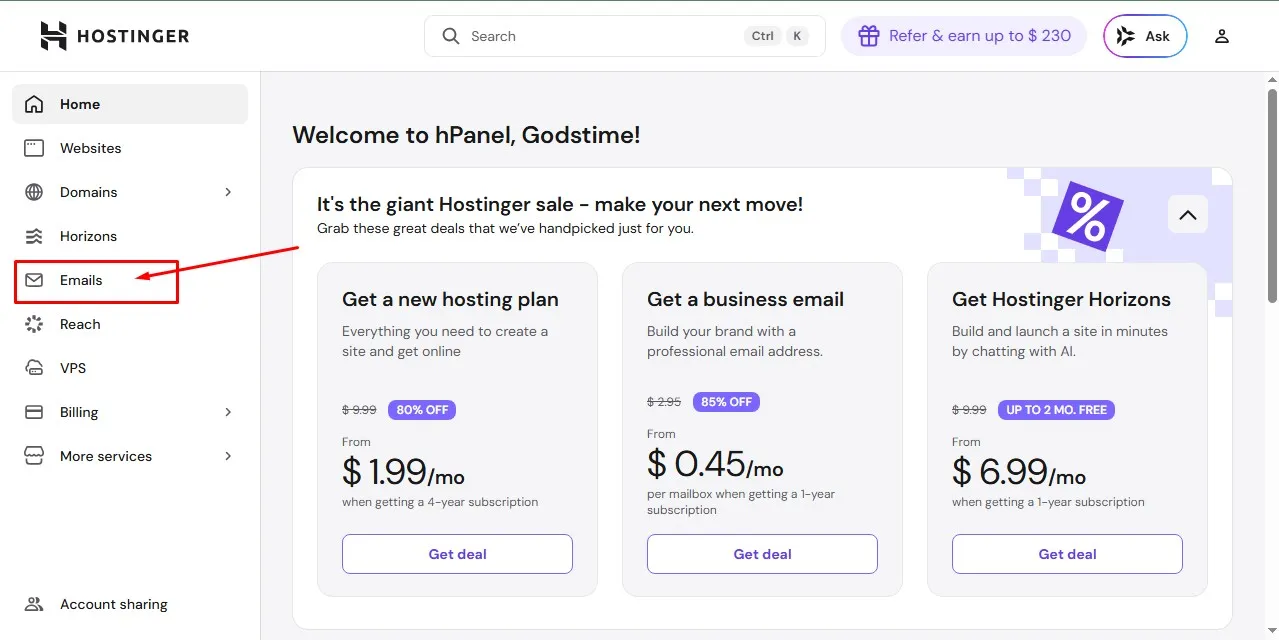
On the left sidebar, click Emails.
You’ll see your domain listed.
Click Manage next to it.
If this is your first time, Hostinger might ask you to buy or claim a email service. Just follow the prompts.
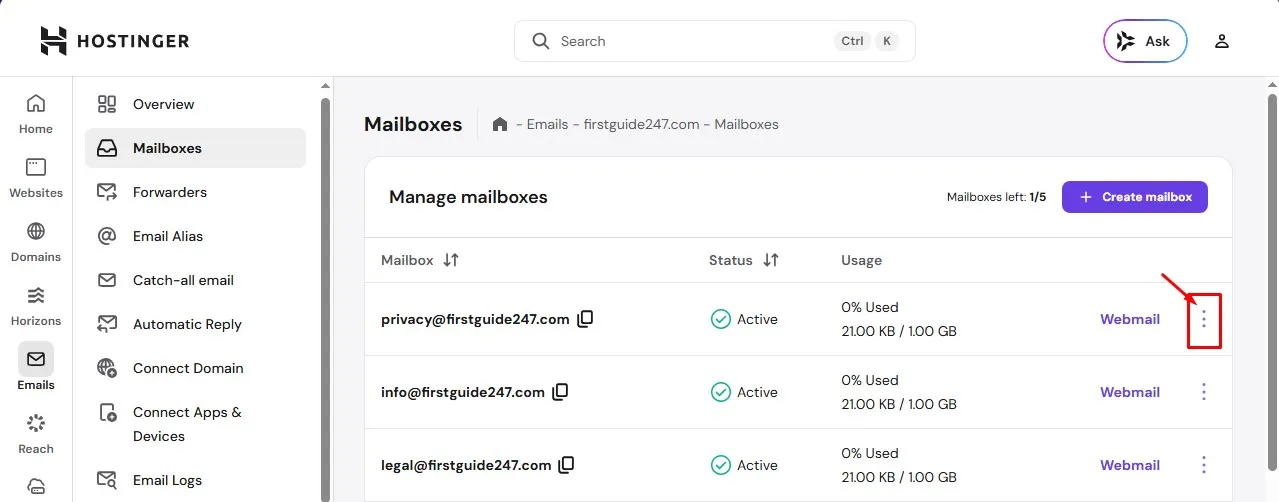
Step 3: Create a New Email Account
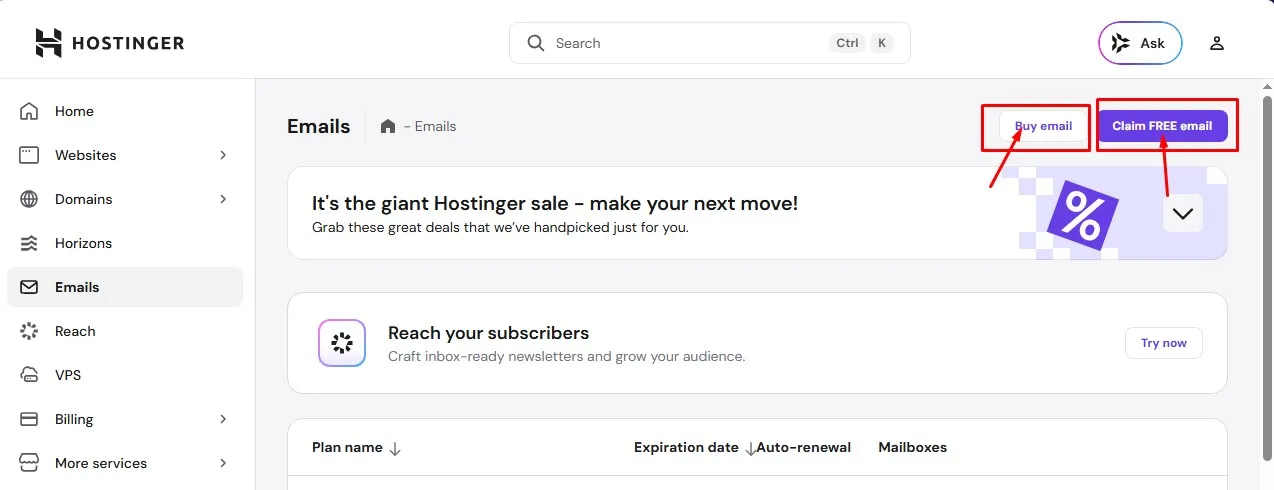
Click buy or claim to create an Email Account.
If you already have a web hosting on Hostinger, they might ask you to claim an email for your website which will last you for a year.
Fill in the required details:
- Email name (info, support, admin, hello, etc.)
- Password
Click Create.
That’s it.
I’m not exaggerating. hPanel makes it ridiculously simple.
Step 4: Access Your Email in Hostinger
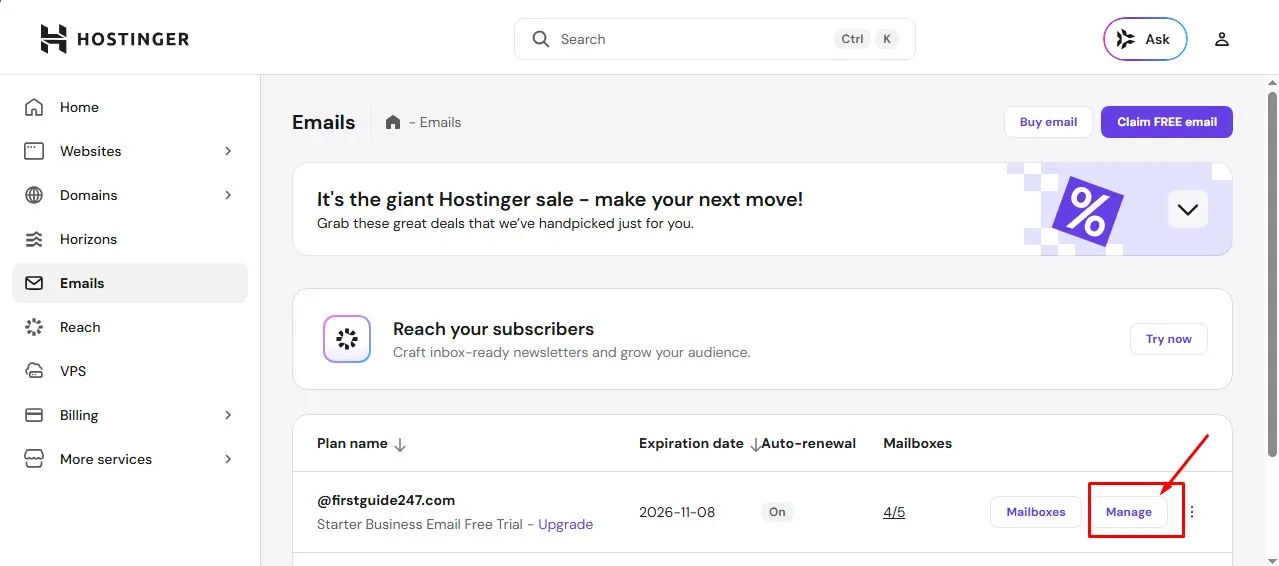
You can access email directly through Hostinger’s webmail interface.
Or again, and this is what I recommend and use. You can connect it to Gmail for convenience.
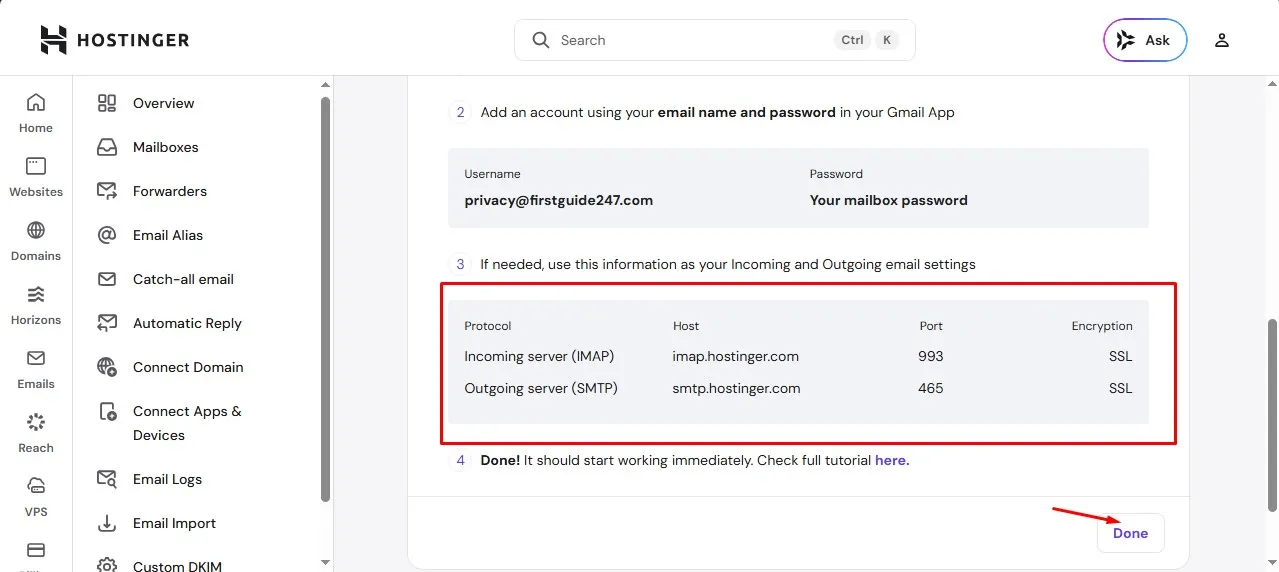
Inside hPanel, you’ll find SMTP and IMAP settings under email configuration.
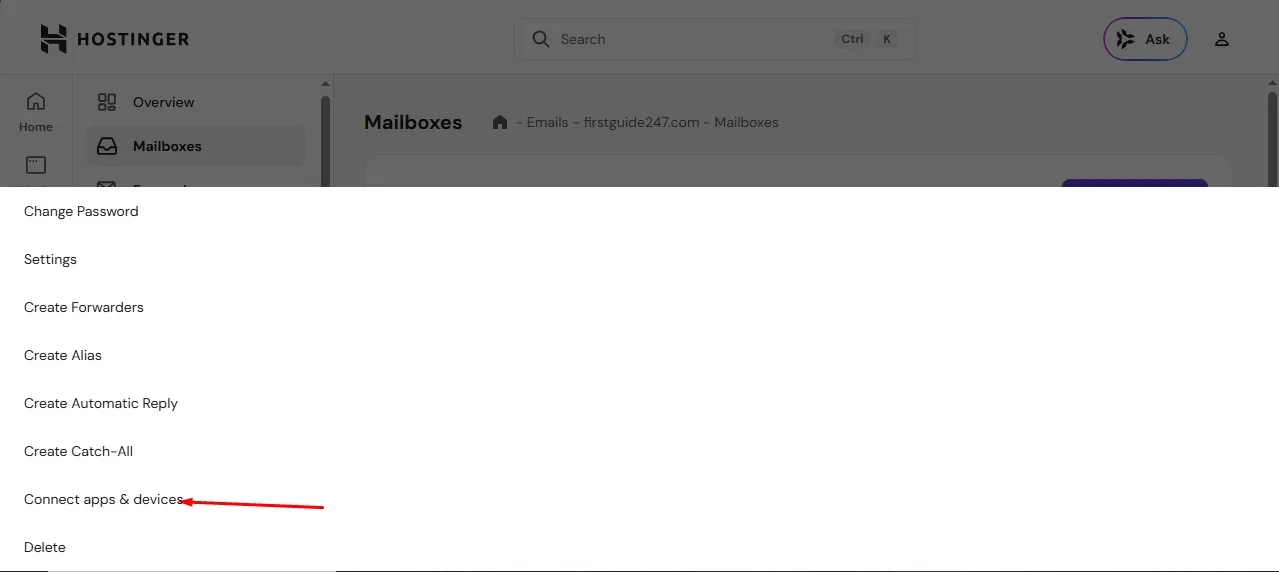
Use those details when adding the account inside Gmail.
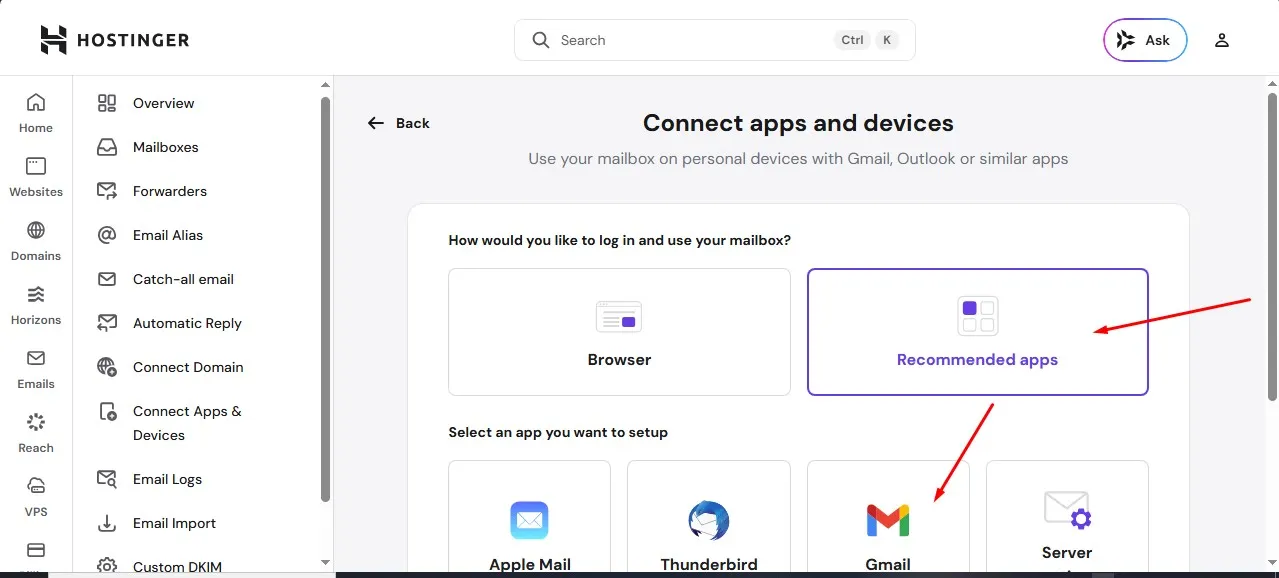
The details you need to connect your custom email to your Gmail account
cPanel vs hPanel – Which Is Easier?
Let me be honest.
If you’re a beginner? hPanel feels easier.
If you like traditional hosting environments? cPanel is powerful and familiar.
But here’s something most beginners don’t realize…
The real challenge isn’t creating the email.
It’s managing it properly.
Common Mistakes I Made (So You Don’t Repeat Them)
Let me confess something.
When I first started, I created a lot of emails like:
info@
support@
admin@
contact@
hello@
Guess what?
I never used or checked half of them.
Emails went unanswered for weeks.
Not good.
Here’s what I recommend instead:
Start with just ONE primary email like:
hello@yourdomain.com
Then forward the messages to your Gmail account.
As your business grows, then you can create specialized emails.
Another mistake?
Not setting up SPF, DKIM, and DMARC records.
These help prevent your emails from landing in spam and not getting delivered.
Inside both cPanel and hPanel, you’ll find email authentication settings. Enable them. Always.
According to a 2024 small business email survey I found (internal hosting data I came across said), nearly 22% of small business emails land in spam because authentication wasn’t configured properly.
Don’t be part of that statistic.
Real-World Scenario: Why This Matters
Let’s say you run a skincare brand like oritim.com. Let’s use this scenario:
Two sellers message a customer:
Seller A:
hyperbeauty@gmail.com
Seller B:
orders@hyperbeauty.com
Which do you think looks structured and trusted?
And which one looks scalable?
Even if both are one-person businesses.
That’s the psychology.
And business is psychology.
Quick Checklist Before You Announce Your New Email
Before you start putting your email everywhere, do these things first:
✅ Test sending and receiving emails
✅ Enable email authentication
✅ Connect to Gmail (optional but recommended)
✅ Add your email to your website contact page
✅ Update your social media bios
And please… don’t forget to check it regularly.
I once missed a partnership opportunity worth $300 because I forgot to check my webmail.
That was a painful lesson.
Bonus Tip: How Many Custom Email Should You Create?
Here’s my simple rule:
- Solopreneur = 1–2 emails max
- Small team = Department emails
- Larger team = Individual staff emails
Keep it simple.
Overcomplicating things early on is how we waste time.
Trust me. I’ve done it.
My Final Thoughts
Creating a custom email address isn’t technical wizardry.
It’s a 10-minute task that instantly upgrades your brand perception.
If you’re using Namecheap or any other webhosting provider with cPanel, follow the steps above.
If you’re using Hostinger with hPanel, even easier.
What matters isn’t the panel.
What matters is that you actually do it.
Because the difference is between looking like a hobbyist and looking like a brand?
Sometimes it’s just one small tiny detail.
Like your email address.
If you found this helpful, you’ll also want to check out my other guides on:
Free vs Paid Web Hosting: What You Should Know Before Choosing
- WordPress vs Blogger: Which Is Better for Beginners?
- How to Start a Blog That Makes Money
They’ll help you build your online presence properly from the ground up.
And if you have any questions about creating your custom email, setting up SMTP, connecting to Gmail, or anything related to website building…
Drop your question in the comments.
I read them and give you the best solutions to them.
And I’ll be happy to help you out. Good luck.